Showing posts with label BBC Good Food.. Show all posts

20 September 2016

Baked Muscovado and Hazelnut Cheesecake with Blackberries for the Sweet World / Cheesecake (no forno) de Açúcar Mascavado e Avelãs, com Compota rápida de Amoras para o Sweet World.


20th of September and it's time for another Sweet World Challenge and this month, we decided to invite you to bake a Cheesecake.
Yes, it has to be baked!


Cheesecake is a dessert that has stood the test of time.
From its earliest recorded beginnings on Samos over 4,000 years ago to its current iconic status around the world, this creamy dessert remains a favourite for sweet teeth of all ages.
The first cheesecake was probably produced on the Greek island of Samos. Back then, this delicious dessert was believed to be a powerful source of energy. Even during the first Olympic Games in Greece, in 776 BC, cheesecakes were served to the athletes. Wedding couples were also served and cherished with this amazing dessert.
The New Yorkers fell in love with cheesecakes back in the 1900s. The credit for the creation of the NY cheesecake is bestowed upon Arnold Reuben (1883-1970). Even though he is best known for his signature sandwiches, Arnold Reuben is generally credited for creating the New York Style cheesecake. Reuben was born in Germany and he went to America when he was young.
The NY styled cheesecake was actually an experiment that Reuben did with a cheese pie. He was invited to a party where he was served with a cheese pie, and he was so dodged by the dish, that he started experimenting with it and came up with what we know today, as the NY Cheesecake.
The Classic New York style cheesecake is served with just the cake - no fruit, chocolate or caramel is served on the top or on the side. This famously smooth-tasting cake gets its signature flavour from extra egg yolks in the cream cheese cake mix.
Saying that, New York is not the only place in America that puts its own spin on cheesecakes.
In Chicago, sour cream is added to the recipe to keep it creamy.
Philadelphia cheesecake is known for being lighter and creamier than New York style cheesecake and it can be served with fruit or chocolate toppings.
In St. Louis, they enjoy a gooey butter cake, which has an additional layer of cake topping on the cheesecake filling. 
Each region of the world also has its own take on the best way to make the dessert. Italians use ricotta cheese, while the Greeks use mizithra or feta. Germans prefer cottage cheese, while the Japanese use a combination of cornflour and egg whites. There are specialty cheesecakes that include blue cheese, seafood, spicy chilies and even tofu!
Despite of all the variations, the popular dessert’s main ingredients - cheese, wheat and a sweetener - remain the same so, if you're interested, choose the kind of cheesecake you want to make and BAKE IT!


12 September 2016

Trifle Cheesecake.


The last recipe of the Summer, just before the new season, the "fall" and the Autumn colours.

When I made this cheesecake, I made it for the Sweet World challenge but, then I saw this one and I thought that, for the challenge, it would be more innovative, different and "close" to the traditional layers of the classic trifle.

Saying that, this cheesecake was so good and refreshing that I have to share the recipe with you all anyway.

It's just a different and beautiful way of enjoying a trifle and a cheesecake, all at the same time. Two dessert classics transformed into a super delicious one.


8 July 2016

Chicken katsu curry burger / Hamburger de frango com molho de caril katsu.


First of all, I start by saying sorry to the ones that try to comment on my blog but can't find the comments box.
Blogger and Google+ together are a disaster and the amount of messages I received this week from people that was complaining that they couldn't comment on my blog was a nightmare.
I didn't do any changes at all!! It's just that Blogger and Google+ combination that definitely doesn't work!!!
So, if you really want to comment, you need to click directly on the post title instead of trying to comment from the blog link. Annoying I know and I'm getting tired of this but, until I decide to change, theres nothing I can do...
Saying that, let's go to today's suggestion!

4 July 2016

Samphire, mushrooms and duck egg on toast / Tosta com salicornia, cogumelos e ovo de pato(a).


Whenever possible, I always try to publish a vegetarian suggestion on Mondays.
As you all know by now, none of us are vegetarians here at home but we like vegetarian meals whenever we fancy them.
Now that the samphire is back in season and I'm a truly assumed mushroom lover, when I saw this Rosie Birkett suggestion in the July issue of BBC Good Food magazine, I couldn't resist it and I can tell you that is truly divine.
I guess you can use good organic hen eggs if you don't want to use or don't like duck eggs but the creaminess that you get from the duck egg yolk is second to none and it really ties together the all combination.
ingredients (serves 2):
50g samphire, washed and trimmed of woody stalks
2 tbsp butter
150g mixed mushrooms, cleaned (I used a mix of Portobello, Oyster and Shiitake)
2 tbsp rapeseed oil (I used olive oil)
2 duck eggs
2 large slices sourdough (I used rye bread)
1 garlic clove, crushed
squeeze of lemon
method:
Blanch the samphire in boiling water for about 30 seconds, then drain.
Melt 1 tbsp of the butter in a frying pan.
Add the mushrooms and season.
Fry for 8 to 10 minutes or until golden crusted and reduced in size.
Heat the oil in another frying pan and fry the eggs gently for a couple of minutes.
Toast the bread until golden.
Transfer the bread to plates and keep warm.
Add the rest of the butter to the mushroom pan along with the garlic and cook for a further minute.
Toss in the samphire to warm through briefly. Season and add the lemon juice.
Top the bread with the eggs and scatter over the mushroom and samphire mixture.
Spoon over any butter from the pan and season the egg yolks.
Serve immediately.
__________________

Como já vos disse várias vezes, não somos vegetarianos, mas gostamos de refeições vegetarianas sempre que, a mim me apetece cozinhá-las e à família, apetece comê-las.
Sempre que possível e, especialmente à segunda-feira, gosto de publicar sugestões vegetarianas e hoje não é excepção.
Estando a salicornia de volta e no seu melhor e sendo eu uma amante, tanto da salicornia (podem encontrar várias sugestões com este ingrediente nos arquivos do blogue), como de cogumelos, claro que não consegui resistir a esta deliciosa sugestão da Rosie Birkett que vem na revista de Julho da revista BBC Good Food.
Costumo dizer que tudo o que seja servido em cima, ou entre fatias de pão, é comida dos Deuses e a corroborar esta minha teoria, fica esta sugestão que, mais uma vez, não decepcionou em nada.
A sugestão é feita com ovos de pato(a) mas caso não gostem ou não encontrem, acredito que com uns bons ovos de galinha caseiros, poderão obter bons resultados.
Contudo, e caso encontrem os ovos de pato, aconselho-vos a experimentar com estes ovos, pois a cremosidade das gemas de ovos de pato é extraordinária. Absolutamente fenomenal. Acreditem!


ingredientes (para 2 pessoas):
50g salicornia, lavada e talos mais grossos descartados
2 colheres sopa de manteiga
150g mistura de cogumelos, limpos (eu usei Portobello, Oyster e Shiitake)
2 colheres sopa de azeite ou óleo de canola
2 ovos de pato(a)
2 fatias grandes de sourdough ou pão tipo alentejano (eu usei um bom pão de centeio)
1 dente de alho, esmagado
umas gotas de limão
preparação:
Escaldar a salicornia em água a ferver por 30 segundos. Escorrer e reservar.
Numa frigideira larga, derreter 1 colher de sopa da manteiga.
Adicioanr os cogumelos e temperar com sal e pimenta preta a gosto.
Fritar os cogumelos por 8 a 10 minutos, ou até estes estarem caramelizados e terem reduzido de tamanho.
Numa frigideira à parte, aquecer o azeite e estrelar os ovos.
Entretanto, torrar as fatias de pão e colocá-las em pratos, mantendo-as quentes.
Adicionar o resto da manteiga aos cogumelos, juntamente com o alho e fritar por mais 1 minuto.
Adicionar a salicornia e envolver tudo muito bem, por forma a aquecer ligeiramente a salicornia, juntamente com os cogumelos.
Rectificar de sal e pimenta e adicionar umas gotas de sumo de limão.
Para servir, colocar os ovos em cima das fatias de pão e polvilhar com a mistura dos cogumelos e salicornia.
Regar com a manteiga que tenha ficado no fundo da frigideira e polvilhar as gemas de ovo com flor de sal.
Servir imediatamente.


Recipe / Receita: BBC Good Food magazine - July 2016.

11 April 2016

Salmon sushi salad / Salada de salmão, com sabor a sushi.


This salad is definitely for sushi lovers!!
You know those days when you're craving sushi but you don't want to go out to buy it or you don't have the time to make proper sushi rolls?
Well, here is the solution! Sushi salad!
I was amazed with this salad and believe me, I'm totally in love with it and it became and will become a favourite here at home!
The sushi flavours are all there and it's like making effortless sushi.
Try it and you'll see that I'm right!

Note: the recipe states that it serves 1 but it was more than enough for 2.

ingredients (serves 1 or 2):
for the dressing:
1 tsp vegetable oil
2 tsp pomegranate molasses
1 tsp soy sauce
method:
Mix all the ingredients together and set aside.
for the salad:
100g sushi rice
50g frozen edamame beans (I didn't have any so, I used frozen baby broad beans peeled)
1 tbsp sesame oil
1 sheet of nori, torn
handful of pomegranate seeds
50g smoked salmon, cut into bite-sized slices
1 small avocado, stoned, peeled and sliced
1 tbsp black sesame seeds
sushi ginger, to serve (optional)
method:
Rinse the sushi rice really well and put it in a small pan covered with 200ml of cold water.
Bring to the boil, then simmer for 10 minutes with the lid on.
Remove from the heat and keep the lid on for 15 minutes.
Meanwhile, pour boiling water over the beans and leave to defrost. Drain and set aside.
Heat the sesame oil in a frying pan and add the nori. Cook for 1 to 2 minutes on a medium heat until crisp.
Transfer the rice to a serving bowl, add the beans, the pomegranate seeds, the salmon and the avocado slices.
Sprinkle with the black sesame seeds, drizzle with the dressing and top with slices of sushi ginger if you like.

__________________

Esta é a salada ideal para os amantes de sushi!!
Sabem aqueles dias em que até apetecia um sushi, mas não apetece ir comprar, nem há ingredientes suficientes, nem tempo para o fazer?
Aqui está a solução! Esta salada é absolutamente genial, pois tem todo o sabor do sushi - aliás, nem perceberão que o estão a comer em forma de salada - não dá trabalho nenhum e é absolutamente viciante.
Eu fiquei fã e cá em casa vai passar a ser um clássico acreditem!
Experimentem e digam se não tenho razão!

Nota: A quantidade de ingredientes listada diz que é para 1 pessoa, mas sinceramente, foi mais que suficiente para 2 pessoas. Tenham, no entanto, esse factor em atenção.


ingredientes (para 1 a 2 pessoas):
para o molho:
1 colher chá de óleo vegetal
2 colheres chá de melaço de romã
1 colher chá de molho de soja
preparação:
Misturar muito bem todos os ingredientes e reservar.
para a salada:
100g arroz para sushi
50g feijão de soja congelado (eu não tinha e então utilizei favas bebé congeladas e sem pele)
1 colher sopa de óleo de sésamo
1 folha de alga nori, partida em bocados
um punhado de grãos de romã
50g salmão fumado, cortado em bocados pequenos
1 pêra abacate pequena, sem caroço, descascada e cortada em meias luas
1 colher sopa de sementes de sésamo pretas
lascas de gengibre para sushi, para servir (opcional)
preparação:
Lavar muito bem o arroz e colocá-lo num tacho pequeno.
Cobrir o arroz com 200ml de água fria, levar ao lume e quando levantar fervura, baixar o lume, tapar o tacho e cozinhar por 10 minutos.
Findo esse tempo, desligar o lume e deixar o arroz repousar no tacho tapado por 15 minutos.
Entretanto, colocar água a ferver sobre o feijão de soja, a fim de o descongelar.
Uns minutos depois, coar o feijão e reservar.
Aquecer o óleo de sésamo numa frigideira e adicionar a alga.
Fritar a alga sobre lume médio, por 1 ou 2 minutos, ou até esta estar crocante.
Transferir o arroz para um prato de serviço.
Polvilhar com o feijão de soja, os grãos da romã, o salmão, as fatias de pêra abacate e as sementes de sésamo.
Regar com o molho e servir com as lascas do gengibre para sushi, caso opte por servi-las.


Recipe / Receita: BBC GoodFood magazine (March 2016).

6 March 2016

Apple rose tart to celebrate Mother's Day / Tarte de rosas de maçã para o Dia da Mãe.


The first time I came across gorgeous apple roses wrapped in puff pastry, and I was like "WOW", was on the great Richard Bertinet instagram account (here).
Much later, on Steller, I saw these gorgeous apple roses in this profile and I read the step by step recipe.
I was astonished with how easy they were to make and, with some leftover homemade puff pastry that I had at home, I tried them and I posted them on instagram. Here!
As today we are celebrating Mother's Day here in the UK, when I saw this gorgeous tart in this March issue of BBC GoodFood magazine, I decided that it would be a fabulous recipe to celebrate the day. TODAY!!
The difference between these roses and the ones that I mentioned above, is that, whilst the previous ones are wrapped in puff pastry, the ones used in this tart are wrapped in marzipan.
Homemade marzipan is something that I never have made until now but, because I wanted to practice it for another recipe (that I'll talk about later in another post), I decided that this would be a great opportunity to make it from scratch.
I must say that, it is very easy to make homemade marzipan and it went pretty well!!
Saying that and before sharing the recipe, I wish a very Happy Mother's Day to all the mother's that are, today, celebrating the joy of being a mother.


Notes:
  • I used homemade puff pastry (recipe here) to make my tart instead of the one described in the recipe.
  • I used a rectangular fluted loose-based tart tin instead of the specified square tin.

for the pastry:
100g butter
200g plain flour
1 tbsp golden caster sugar
1 egg, separated
splash of vanilla extract
method:
Rub the butter and flour together in a large bowl using your fingertips.
Work through the mixture until it resembles breadcrumbs. Stir in the sugar, egg yolk (reserve the white), vanilla extract and 2 to 3 tsp of cold water to form a ball of dough that leaves the bowl clean. Wrap in cling film and chill for 30 minutes.
Heat the oven to 190ºC.
When chilled, roll out the pastry in order to fit a 23cm square fluted loose-based tart tin and trim the edges with scissors so they stand up, about 5mm above the edge.
Prick the surface of the pastry a few times with a fork.
Place a layer of foil on top, add some baking beans and blind bake for 15 minutes.
Remove the beans and foil, brush the pastry with the reserved egg white and return to the oven for a further 10 to 15 minutes until biscuity.
for the roses:
3 red apples, cored, halved and thinly sliced
juice 1/2  lemon
100g marzipan
method:
Put the apple slices in a large bowl.
Squeeze over the lemon juice and cover with water.
Microwave on high for 4 minutes, then drain and pat dry on some kitchen paper.
Roll out 75g of the marzipan out on a surface dusted with a little icing sugar until it’s approximately 20 x 15cm.
Cut into 3 rectangles and lay eight apple slices down the long edge of each strip of marzipan and reserve the rest.
Fold the bare edge of each strip over to cover the apples, then roll up from the short edge (see here how to roll).
Place the apple roses in a muffin tin so that they hold their shape.
Roll the remaining marzipan into small balls.
for the filling:
100g butter, melted
100g golden caster sugar
2 eggs
140g ground almond
75g plain flour
1 tbsp milk
method:
Mix the butter, sugar, eggs, almonds, flour and milk together in a large bowl and whisk until well combined.


for the glaze and to finish:
4 tbsp apricot jam
icing sugar, for dusting
method:
Take the tart case out of the oven and spread with the filling.
Gently press your apple/marzipan roses into the filling, evenly spaced out, then scatter over the balls of marzipan.
Fill the gaps with the remaining apple slices so that the filling is covered, curving the slices a little as you go to create additional petals on the roses, or rolling them up tightly to look like rosebuds, all with the peel side facing upwards.
Return to the oven for 30 to 35 minutes, then leave the tart to cool in the tin for 10 minutes.
Meanwhile, heat the apricot jam in a small saucepan until simmering, then pass it through a metal sieve into a bowl.
Brush it over the surface of the tart while both the jam and the tart are still warm.
Serve the tart a little warm, or leave to cool, then turn it out onto a serving plate and dust with icing sugar.

__________________

A primeira vez que vi umas rosas lindas de maçã envoltas em massa folhada, foi aqui, no instagram deste grande Chef da Pastelaria, o Richard Bertinet.
Confesso que na altura fiquei de queixo caído com a beleza daquelas rosas!
Meses mais tarde, no Steller, vi, neste perfil, estas rosas lindas, com descrição do passo a passo de como fazer as rosas.
Como na altura tinha um resto de massa folhada caseira que não estava a pensar utilizar, decidi experimentar as benditas rosas que me andavam a deixar deslumbrada.
A experiência correu lindamente e, embora não as tenha publicado aqui no blogue (por ter sido só uma experiência), publiquei-as aqui, no meu instagram.
A revista BBC GoodFood deste mês, traz a receita desta tarte linda, que hoje vos deixo e que eu, assim que a vi, decidi logo que seria a tarte a partilhar para comemorar o Dia da Mãe, pois todas as mães adoram rosas, certo?
Hoje, aqui no Reino Unido, celebra-se o Dia da Mãe e assim sendo e antes de partilhar a receita da tarte, desejo um muito feliz Dia da Mãe, a todas as mulheres que têm o privilégio e a alegria de ser mães.


Notas:
  • A diferença entre estas rosas e as de que vos falei na introdução, é que estas são enroladas em maçapão.
  • Eu fiz maçapão caseira, pois nunca tinha feito e como queria praticar para uma receita de que falaremos mais adiante, achei que esta era uma boa altura para fazê-lo. Devo salientar que é facílimo e correu lindamente.
  • No que diz respeito à massa da tarte, embora vos deixe a receita da massa original especificada na revista, eu usei massa folhada caseira (receita aqui) e não a que abaixo descrevo.
  • A receita original é feita numa forma de tarte quadrada, mas eu resolvi fazê-la numa forma rectangular.

para a massa:
100g manteiga
200g farinha de trigo branca
1 colher sopa de açúcar refinado amarelo
1 ovo, separado
umas gotas de extracto de baunilha
preparação:
Numa taça larga, misturar a farinha e a manteiga, esfregando com as pontas dos dedos, até obter uma mistura areada.
Adicionar o açúcar, a gema do ovo (reservar a clara), a baunilha e 2 ou 3 colheres soap de água gelada.
Misturar tudo muito bem, até a massa se juntar e taça ficar limpa.
Embrulhar a massa em película aderente e refrigerar por 30 minutos.
Aquecer o forno a 190ºC.
Com a ajuda do rolo, estender a massa sobre uma superfície ligeiramente enfarinhada, por forma a que fique com um tamanho suficientemente grande para forrar uma tarteira quadrada de fundo amovível, com cerca de 23cm (ou outra que queiram usar).
Cortar o excesso da massa com uma tesoura, por forma a que a massa fique 5mm acima da bordadura da tarteira.
Picar toda a superficie da massa com um garfo, cobrir a massa com papel de alumínio ou papel vegetal, encher com bolas de cerâmica ou leguminosas e levar ao forno por cerca de 15 minutos.
Remover o papel de alumínio ou vegetal e as bolas de cerâmica ou leguminosas, pincelar a massa com a clara do ovo reservada e voltar a levar a tarteira ao forno por mais 10 a 15 minutos, ou até a massa estar douradinha e com aspecto de biscoito crocante.
para as rosas:
3 maçãs vermelhas, sem caroço e fatiadas em meias luas muito fininhas
sumo de 1/2 limão
100g maçapão
preparação:
Colocar as meias luas de maça numa taça. Regá-las com o sumo do limão e cobrir com água fria.
Levar a taça ao micro ondas, na potência máxima, por cerca de 4 minutos.
Escorrer as maçãs e secá-las muito bem com papel absorvente de cozinha.
Estender 75g da maçapão sobre uma superfície polvilhada com açúcar em pó, por forma a obter um rectângulo de 20 x 15cm.
Cortar o rectângulo em 3 rectângulos iguais e colocar 8 meias luas de maçã numa das extremidades mais longas de um dos rectângulos.
Começar a enrolar a maçapão com as meias luas de maçã, por forma a obter um efeito de rosa (ver aqui como enrolar).
Repetir com os dois rectângulos de maçapão restantes.
Colocar as rosas de maçapão e maçã numa forma de muffins, para que não se desmanchem até serem utilizadas.
Com a maçapão que sobrou, moldar bolinhas e reservar.
Reservar as meias luas de maçã que não forem utilizadas nas rosas.
para o recheio:
100g manteiga, derretida
100g açúcar refinado branco
2 ovos
140g amêndoa moída
75g farinha de trigo branca
1 colher sopa de leite
preparação:
Numa taça, misturar todos os ingredientes, por forma a combinar tudo muito bem e obter uma mistura cremosa.
para pincelar e finalizar a tarte:
4 colheres sopa de doce de alperce
açúcar em pó, para polvilhar
preparação:
Espalhar o recheio sobre a base da tarte pré cozida.
Delicadamente, colocar as rosas de maçapão/maçã sobre o recheio, pressionando-as ligeiramente.
Colocar as meias luas de maçã reservadas, sobre o recheio, dobrando-as aqui e ali, por forma a formar pequenos botões de rosa ou pétalas soltas.
Espalhar as bolas de maçapão reservadas, sobre a tarte.
Voltar a levar a tarteira ao forno e cozer por cerca de 30 a 35 minutos.
Deixar a tarte arrefecer na própria tarteira, por cerca de 10 minutos.
Entretanto, aquecer o doce de alperce num tachinho e coá-lo de seguida.
Pincelar toda a superfície da tarte, enquanto quente, com o doce coado e também ele, ainda quente.
Servir a tarte morna ou deixar arrefecer completamente e polvilhar com açúcar em pó antes de servir.


Recipe / Receita: BBC GoodFood magazine - March 2016.

1 March 2016

Creamy jerusalem artichoke soup with parmesan skins / Sopa cremosa de girasol batateiro, com cascas crocantes e parmesão.


The first and mainly thing that caught my attention in this recipe, was the using of not just the interior of the artichokes, but also the skins.
As I had a big batch of jerusalem artichokes at home, I made this salad, the soup that I'm leaving you today and with a few remaining artichokes left, I also made a batch of jerusalem artichoke crisps that I'll be publishing soon.
ingredients (serves 4):
juice of 1/2 lemon
500g jerusalem artichokes, washed and scrubbed
2 tsp vegetable oil
25g butter
1 onion, roughly chopped
1 floury potato (140g), roughly chopped
600ml vegetable stock
3 tbsp double cream, plus a little extra to serve
1 to 2 tbsp finely grated parmesan cheese
leaves of 1 rosemary spring, finely chopped
method:
Half fill a large bowl with water and add the lemon juice.
Peel the artichokes, then toss the peelings with the vegetable oil in a bowl and set aside.
Chop the artichokes into rough chunks and put them in the lemony water.
Melt the butter in a large saucepan, add the onion, potato and seasoning.
Drain the artichokes and stir them in.
Cover the pan and sweat gently for 15 minutes, stirring from time to time.
Pour in the stock, cover and simmer for 10 to 15 minutes, or until the vegetables are tender.
Whizz the soup until very smooth. Add the cream and season to taste.
Preheat the oven to 220ºC.
Line a baking tray with baking paper.
Scatter the skins over and roast for 10 minutes.
Turn them over, scatter with the parmesan and rosemary and roast for another 5 minutes, or until they are crisp and dry.
Season with salt and freshly ground black pepper.
Serve the soup with a swirl of cream and a scatter of the crispy skins.


__________________

Como podem ver nos arquivos do blogue, já fiz várias sopas com girassol batateiro.
Embora tivesse uma boa quantidade de girassol batateiro em casa (que utilizei nesta salada, na sopa que hoje vos trago e numas crisps magníficas que publicarei depois), não estava a pensar utilizá-lo noutra sopa.
Até que, ao ler esta receita, me chamou e cativou a atenção e interesse, o facto de, não só ser utilizado o interior do girassol batateiro, mas também as cascas.
Claro que a curiosidade falou mais alto e lá saiu mais uma sopa.
Magnífica, tenho de confessar...


ingredientes (para 4 pessoas):
sumo de 1/2 limão
500g girassol batateiro, bem lavado e esfregado
2 colheres chá de óleo vegetal
25g manteiga
1 cebola, picada grosseiramente
140g de batata, cortada em pedaços
600ml caldo de legumes
3 colheres sopa de natas para bater + extra para decorar a sopa
1 a 2 colheres sopa de queijo parmesão ralado
folhas de uma haste de alecrim, finamente picadas
preparação:
Colocar água numa taça e juntar-lhe o sumo do limão.
Descascar o girassol batateiro e colocar as cascas numa taça, misturando-as bem com o óleo vegetal.
Cortar o girassol batateiro em pedaços e colocá-los de imediato na água com o limão (para que não oxidem).
Derreter a manteiga num tacho ou panela.
Adicionar a cebola e a batata e temperar de sal e pimenta.
Escorrer o girassol batateiro e juntá-lo ao preparado anterior.
Tapar o tacho e cozinhar os legumes em lume brando por cerca de 15 minutos, mexendo de vez em quando.
Adicionar o caldo de legumes, voltar a tapar o tacho e deixar cozinhar por mais 10 ou 15 minutos, ou até os vegetais estarem macios.
Com a varinha mágica, ou no liquidificador, reduzir a sopa a um puré macio.
Adicionar as natas e temperar de sal e pimenta preta moída na altura, a gosto.
Entretanto, aquecer o forno a 220ºC e forrar um tabuleiro com papel vegetal.
Polvilhar as cascas sobre o papel vegetal e levar ao forno por 10 minutos.
Virá-las, adicionar o parmesão ralado e o alecrim picado e levar ao forno por mais 5 minutos, ou até as cascas estarem crocantes e sequinhas.
Temperar as cascas com sal e pimenta preta moída na altura, a gosto.
Servir a sopa decorada com um bocadinho de natas e polvilhada com as cascas crocantes.


Recipe / Receita: BBC GoodFood magazine - February 2016.

15 February 2016

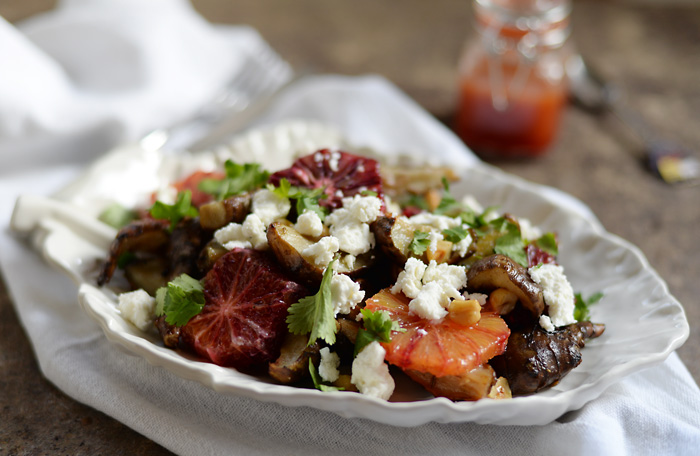
Warm jerusalem artichoke, blood orange and feta salad / Salada morna de girassol batateiro, laranja sanguínea e queijo feta.


After so many parties, celebrations and sweets, a simple salad really goes down a treat!
This delicious wintery salad combines two of my favourite ingredients and as soon as I saw this fabulous suggestion I didn't think twice to make it.
The combination is fantastic and the sweet and sour flavours alongside all the different textures, are truly amazing.
I served it as a mail meal and it was more than enough for 3 adults.
ingredients (serves 4 to 6 as a side dish):
750g of jerusalem artichokes, scrubbed and quartered
2 tbsp olive oil
4 blood oranges, plus juice of 1 (about 2 1/2 tbsp)
2 tsp Sherry vinegar
1 tbsp extra virgin olive oil
1/2 tsp clear honey
50g blanched hazelnuts, very roughly chopped
1 tsp cumin seeds, lightly crushed
100g feta, crumbled
25g pack flat leaf parsley, roughly chopped
method:
Heat the oven to 200ºC.
Toss the artichokes, olive oil and half the orange juice in a large roasting tin.
Season well and roast for 45 minutes, turning halfway through, until tender and turning golden.
Meanwhile, peel and segment or slice the remaining oranges.
Put the vinegar, remaining orange juice, extra virgin olive oil and the honey in a jug and whisk to combine. Season to taste.
Scatter the cumin and and the hazelnuts over the artichokes and roast for another 5 minutes.
Remove from the oven and cool slightly.
Gently fold in the oranges, feta, parsley and the dressing and serve.
__________________


Depois de tantos festejos, comemorações e doces, o que sabe mesmo bem é uma saladinha!
Esta salada de Inverno, combina ingredientes que adoro e é uma verdadeira delícia, tanto em termos de sabores como de texturas.
Eu servi-a como refeição principal e foi mais que suficiente para 3 adultos.
ingredientes (para 4 a 6 pessoas, como acompanhamento):
750g girassol batateiro, lavado, esfregado e cortado em quartos
2 colheres sopa de azeite
4 laranjas sanguíneas + o sumo de 1 (cerca de 2 1/2 colheres sopa de sumo)
2 colheres chá de vinagre de xerez
1 colher sopa de azeite extra virgem
1/2 colher chá de mel claro
50g avelãs sem pele, picadas grosseiramente
1 colher chá de sementes de cominho, esmagadas ligeiramente
100g queijo feta, desfeito
25g salsa, picada grosseiramente
preparação:
Aquecer o forno a 200ºC.
Num tabuleiro de ir ao forno, combinar o girassol batateiro com as duas colheres de sopa de azeite  e metade do sumo da laranja.
Temperar de sal e pimenta preta moída na altura e levar ao forno por cerca de 45 minutos, mexendo ao fim de 20 a 25 minutos.
Entretanto, descascar as 4 laranjas e segmentá-las, ou cortá-las em rodelas.
Num frasquinho, colocar o vinagre, o restante sumo de laranja, o azeite extra virgem e o mel. Temperar de sal e pimenta a gosto e misturar tudo muito bem.
Quando o girassol batateiro estiver macio, colocar as sementes de cominho e as avelãs no tabuleiro e cozinhar por mais 5 minutos.
Retirar o tabuleiro do forno e deixar arrefecer ligeiramente.
Muito delicadamente, juntar as laranjas, o queijo feta, a salsa e o molho, ao girassol batateiro. Envolver tudo muito bem e servir.


Recipe / Receita: BBC GoodFood magazine - February 2016.