Showing posts with label Cinnamon / Canela.. Show all posts

6 October 2017

Churros.


Although they are mostly connected to Spain, the origin of churros is unclear.
One theory suggests they were brought to Europe from China by the Portuguese. The Portuguese sailed for the Orient and, as they returned from Ming Dynasty China to Portugal, they brought along with them new culinary techniques, including altering dough for youtiao, also known as Youzagwei in southern China, for Portugal.
The new pastry soon crossed the border into Spain, where it was modified to have the dough extruded through a star shaped die rather than pulled.
Another theory is that the churro was made by Spanish shepherds, as a substitute of fresh bakery goods. Churro paste was easy to make and fry in an open fire in the mountains, where shepherds spend most of their time.
Meanwhile, in Spanish towns, an exchange occurred which transformed the snack from shepherd’s fare to a royal delicacy.
While the conquistadors took churros to South America, they brought back chocolate and plentiful sugar, turning dull dough sticks into a sweet sensation.
Once in South America, the churro continued to evolve from a plain, thin stick to a more rotund stuffed specialty, varying according to region.
While the Brazilians prefer a chocolate filling, the Cubans like their churros with Guava stuffing while the Mexicans, with dulce de leche or vanilla.
In Uruguay the churros are stuffed with cheese and in South Eastern Spain they are still eaten with salt rather than sugar, which makes them closer relatives of the original youtiao.
Mexican churros are said to be the bridge between dessert and savoury churros as salt is added to the dough before kneading, while the filling is over sweet.
After all these very interesting contradictions, flavour variations and facts, the most important thing to retain is that, churros are a very addictive and delicious delicacy.
The recipe I chose today, is this one, from the brand new Michael Rantissi & Kristy Frawley, Hummus and Cº. book "Middle Eastern food to fall in love with" and, I have to say, they were pretty amazing!
This is the second time I make churros. The first time I've made them was this recipe here and, although they were absolutely delicious, this time I wanted to try a different recipe and that's why, I chose the one I'm leaving you today.
I served my churros with a choice of this chocolate sauce and this salted caramel sauce but, you can serve them with either, both, just one, none, or other sauces to your own liking.
I just made half of the recipe but, as always, I'm regretting it now and so, I'm leaving you the full recipe.
Hope you give these churros and both sauces a try because, they are a well worthy "path of calories" to heaven :))).

15 August 2017

Classic Apple Pie / Pie clássica de Maçã.


A pie is nothing more than a baked dish of fruit, meat and/or vegetables, typically with a top and base of pastry.
Searching about the pie origins and its history, I found this amazing article that I think, is worth a good reading because it's very well written and also very interesting.
I truly adore savoury pies but, this is Sweet World and the challenge was to make a sweet pie...
Although I love all kinds of fruit pies, my kids are very picky "fruit pie wise".
I really, really wanted to make a cherry pie but, I didn't risk having to eat it all by myself (which wouldn't have been a problem by the way...) and so I decided to make a simple, classic but very delicious apple pie because it's a favourite here at home and I knew it would go down really happily and quick (which in fact did).
The recipe is from Hannah Miles "Sweetie Pie" gorgeous book.
Saying that, here it is, an Apple Pie for the 19th edition of the Sweet World challenge.

27 June 2017

Chocolate and Chilli Bread / Pão com Chocolate e Malagueta.


As soon as I read the theme, I knew straightaway the bread I was going to bake and it's this one that I'm leaving you today!
I was dying to try this Lakeland Magazine chocolate and chilli bread since the day I got the magazine but, for one reason or the other, it never happened so, this time was the time! I had no doubts whatsoever, that this would be the bread to bake this month.
I had to adapt the recipe because the original one is for a bread maker machine. Although I have a bread maker which I use sometimes for more hard work kneading processes, I don't like to make bread in the bread maker so, the method I writing down is the one I used. Saying that, if you want to use a bread maker, go ahead and just follow the machine manufacturer's instructions.
Here it is, for Ana and for this monthly challenge that I truly adore, a Chocolate and Chilli Bread!

22 May 2017

Carrot Keftedes / Keftedes de Cenoura.


Although, usually, keftedes are made with minced meat, this vegetarian option is a great and super delicious solution for those that are avoiding meat.
Served with a simple salad, Skordalia and/or Tabbouleh, these are just perfect warm or cold.
The recipe is from Chef Maria Elia "Smashing Plates" cookbook and it's another fabulous suggestion that I'm leaving for Marta and her May "Carrot - the ingredient of the month"!

22 March 2016

Anytime Berry Crumble / Um Crumble de frutos vermelhos para qualquer altura do ano.


This crumble recipe is actually a 3 in 1 as it calls for the cinnamon sugar recipe, the crumble mixture and the berry mixture itself.
Three fabulous suggestions from Emilie Raffa "The Clever Cookbook" book - that I truly ADORE to bits - that brilliantly come together in one single recipe or, that you can use with/in your favourite recipes or combinations.
ingredients for the cinnamon sugar butter:
227g unsalted butter, softened
50g sugar
2 tbsp ground cinnamon
1 tsp fine sea salt
method:
Put all the ingredients in the bowl of your food processor and process until blended.
Scrape the mixture into a bowl.
for the crumble mixture (makes 715g):
227g cinnamon sugar butter (above), softened
250g flour
220g light brown sugar
80g rolled oats
(I also added 40g of flaked almonds for extra crunch)
method:
Put all the ingredients in a bowl and mix with your hands until crumbs start to form.
Squeeze together for big crumbles or keep them small and sandy.
As you'll not need all this quantity for the crumble recipe I'm leaving you today, yo can store the remaining mixture into a zip-top bag and freeze for up to 3 months (no need to defrost before using).
for the berry mixture:
unsalted butter, for greasing the pan
454g frozen mixed berries
25g sugar
1 tbsp cornflour
325g crumble recipe (above)
vanilla ice cream or crème fraîche, to serve
method:
Preheat the oven to 175ºC.
Lightly grease a 23 x 33cm baking dish with butter.
Put the berries in a large bowl and sprinkle with the sugar and cornflour. Mix together to combine.
Tip the mixture into the prepared dish and casually sprinkle the crumbs over the top.
Bake for 30 to 40 minutes or until perfectly golden and the fruit is hot and bubbly.
Serve warm, topped with a scoop of vanilla ice cream or crème fraîche.

__________________

Hoje deixo-vos este crumble magnífico.
Adoro crumble e adoro frutos vermelhos e não resisto a uma boa receita de crumble.
Na verdade, esta receita é um 3 em 1, pois engloba 3 receitas do livro lindo que já todos conhecem por esta altura, o "The Clever Cookbook" da Emilie Raffa (eu sei... estou a tornar-me repetitiva, mas é mesmo um must este livrinho...).


ingredientes para a manteiga de açúcar e canela:
227g manteiga sem sal, amolecida
50g açúcar refinado branco
2 colheres sopa de canela em pó
1 colher chá de sal de mesa fino
preparação:
Colocar todos os ingredientes no copo do robot de cozinha e processar até obter uma mistura macia e homogénea.
para o crumble (para 715g):
227g da receita da manteiga acima
250g farinha
220g açúcar mascavado claro
80g flocos de aveia
(a receita não pede, mas eu também adicionei 40g de amêndoas laminadas)
preparação:
Colocar todos os ingredientes numa taça e misturar bem, por forma a obter uma mistura areada.
Caso gostem do crumble com pedaços mais compactos, amassar  por forma a formar bolas maiores da mistura, caso contrário, esfregar, até obter uma consistência areada.
Nota: Como para a receita deste crumble de frutos vermelhos não precisar de toda a quantidade desta mistura, podem colocar a restante num saco com fecho e congelar por cerca de 3 meses.
Podem utilizar a mistura congelada noutros crumbles à vossa escolha e nem é preciso descongelar.
para a fruta:
manteiga para untar o recipiente do crumble
454g mistura de frutos vermelhos congelados
25g açúcar refinado branco
1 colher sopa de farinha Maizena
325g mistura do crumble acima
gelado de baunilha ou crème fraîche, para servir
preparação:
Aquecer o forno a 175ºC.
Untar ligeiramente com manteiga, um recipiente de Pirex, refractário ou outro que possa ir ao forno, com cerca de 23 x 33cm.
Colocar os frutos vermelhos numa taça.
Polvilhar com o açúcar e a Maizena e envolver tudo muito bem com as mãos.
Colocar a mistura no recipiente previamente preparado e polvilhar (sem compactar) com a mistura do crumble.
Levar ao forno por cerca de 30 a 40 minutos, ou até o topo estar douradinho e os sucos da fruta começarem a ferver à volta e acima do topping.
Servir quente, acompanhado de uma bola de gelado de baunilha ou crème fraîche.

Recipe / Receita:

7 December 2015

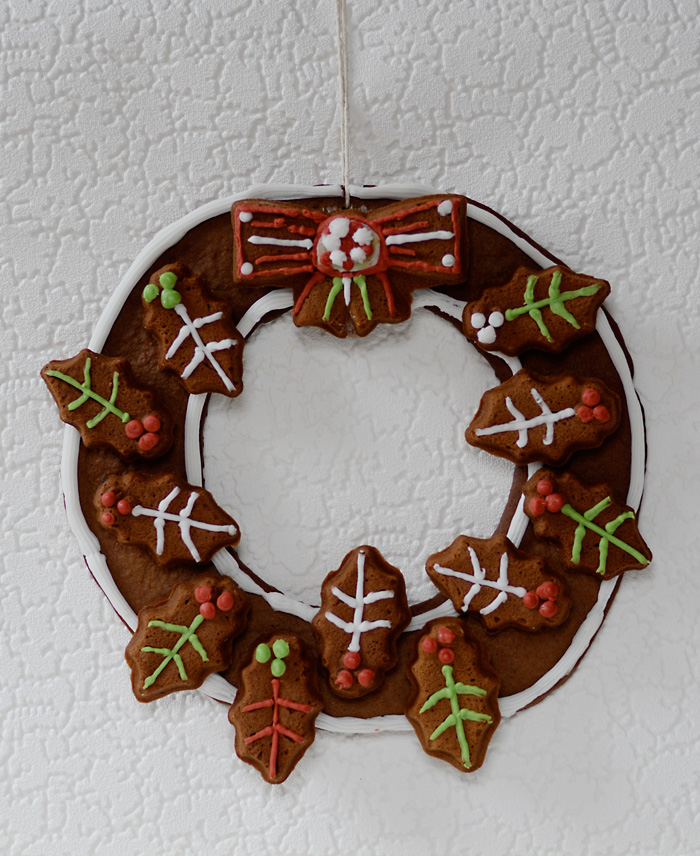
Gingerbread wreath / Coroa de gengibre.


The December issue of Delicious Magazine arrived full of gorgeous and scrumptious suggestions for Christmas and my first Christmas bake this year, is this gingerbread wreath.
The gingerbread dough itself, is from Mima Sinclair fantastic book "Gingerbread Wonderland" and it's the best gingerbread I ever tried. It is so easy to work with that it will be the dough I'm going to use for the annual gingerbread house (if I have the time to make it of course...).
For the decorations, I used shop bought icing but feel free to make your own.
ingredients for the gingerbread dough:
60g light molasses, golden syrup or honey
80g black treacle (for a darker dough like mine)
Note: If you don't want to use the black treacle, use 140g of the golden syrup, molasses or honey.
200g soft light brown sugar
200g unsalted butter
finely grated zest of 1 lemon
4 tsp ground ginger
2 tsp ground cinnamon
1/2 tsp freshly grated nutmeg
1/4 tsp ground cloves
1/2 tsp bicarbonate of soda
500g plain flour
1 tsp salt
1 medium egg, lightly beaten
for the decoration:
white, red and green icing or royal icing (or any other colours you fancy)
caramel glue, optional
method:
In a large saucepan, heat the golden syrup, black treacle, sugar, butter, lemon zest and spices, stirring over a low to medium heat, until the sugar has dissolved.
Increase the heat and bring the mixture to a boiling point, then take off the heat and beat in the bicarbonate of soda.
Leave to cool for 15 minutes and then pour the mixture into a large mixing bowl.
Sift the flour and salt, then fold into the spiced sugar mixture in batches, using a wooden spoon or a stand mixer.
Add the egg and beat until just combined.
The dough will be very sticky but don't be tempted to add more flour.
Scrape out the dough onto a clean surface and knead together until just smooth.
Wrap in clingfilm and chill in the fridge for 1 hour.
Preheat the oven to 160ºC.
Line 3 large baking trays with baking paper.
Cut a large piece of baking paper and roll out the gingerbread dough on top of it until 5mm thick.
Put a 25cm plate on the dough and cut round it. Using a smaller plate, cut out the centre to give a 4cm wide ring of dough.
Using different size cutters and shapes, cut out shapes from the remaining dough.
Freeze the gingerbread shapes for 5 minutes until hard.
Bake the shaped biscuits in batches, for 10 to 15 minutes or until golden brown at the edges.
Bake the ring for 15 to 20 minutes or until golden brown  at the edges.
Leave to cool inside the trays for 5 minutes and then transfer onto wire racks to cool completely.
Once cooled, decorate with the icings and colours of your choice. Arrange the shapes to taste on the ring.
Using the white icing or caramel (made with 200g sugar and 60ml of cold water), glue the back of the biscuits to the ring and leave to set firm.

__________________

A revista Delicious deste mês vem recheada de lindas e deliciosas sugestões para o Natal e uma delas, é uma coroa de gengibre decorada com estrelas, mas que eu decidi decorar com folhas de azevinho.
Embora a receita venha na revista, a mesma é retirada do livro "Gingerbread Wonderland" da autora Mima Sinclair.
A massa de gengibre, é, sem dúvida, a melhor que já fiz e é tão fácil de trabalhar que, se ainda tiver tempo claro, será com esta base de massa que farei a casinha de gengibre.
Quanto ao sabor, é também o mais delicioso biscoito de gengibre que já provei.
Quanto ás decorações, eu usei icing de compra e em bisnaga, mas se quiserem, podem fazer o vosso em casa e colori-lo a gosto e de acordo com os formatos de biscoito escolhidos.
Assim sendo, aqui fica a coroa de Natal de gengibre, a primeira sugestão de Natal a sair da minha cozinha!
ingredientes para a massa de gengibre:
60g melaço light, golden syrup ou mel (eu usei golden syrup) ou 140g de uma destas opções, caso não queiram usar o black treacle que está mencionado a seguir.

80g black treacle (no caso de quererem um biscoito escuro como o meu)
200g açúcar amarelo
200g manteiga sem sal
raspa de 1 limão
4 colheres chá de gengibre em pó
2 colheres chá de canela em pó
1/2 colher chá de noz moscada ralada na altura
1/4 colher chá de cravinho em pó
1/2 colher chá de bicarbonato de sódio
500g farinha de trigo branca
1 colher chá de sal fino
1 ovo médio, ligeiramente batido
para decorar:
icing vermelho, verde e branco ou as cores escolhidas de acordo com o formato dos biscoitos,
caramelo, para colar, opcional
preparação:
Num tacho sobre lume baixo a médio, colocar todos os primeiros ingredientes e todas as especiarias (9 primeiros ingredientes).
Aquecer, mexendo sempre, até o açúcar estar dissolvido.
Aumentar o lume e deixar que a mistura atinja o ponto de ebulição. Retirar o tacho do lume e adicionar o bicarbonato de sódio, mexendo bem.
Deixar a mistura arrefecer por 15 minutos e depois transferi-la para uma taça.
Peneirar a farinha com o sal e adicioná-la, em 2 ou 3 vezes, à mistura anterior, mexendo bem com uma colher de pau ou, se preferir, com a batedeira eléctrica.
Adicionar o ovo batido e bater só até este estar incorporado (atenção para não bater em demasia).
A massa ficará molenga e pegajosa mas não adicione mais farinha.
Colocar a massa sobre a bancada da cozinha e amassar, só até esta estar macia.
Embrulhar a massa em película aderente e refrigerar por 1 hora.
Aquecer o forno a 160ºC.
Forrar 3 tabuleiros com papel vegetal.
Sobre uma folha grande de papel vegetal, estender a massa com o rolo, até obter uma espessura de cerca de 5mm.
Colocar um prato com cerca de 25cm de diâmetro sobre a massa e cortar a massa à volta do prato.
Colocar um prato menor ou uma tigela em cima do círculo anterior (no centro) e cortar à volta, a fim de obter um anel com cerca de 4 cm (usar o centro cortado para os biscoitos).
Colocar o anel num dos tabuleiros preparados e congelar por 5 minutos.
Com cortadores de biscoitos das formas e tamanhos desejados, cortar formas com o restante massa e colocá-las nos tabuleiros. Congelar por 5 minutos.
Levar o tabuleiro com o anel ao forno e cozer por  a 20 minutos, ou até os bordos estarem douradinhos.
Cozer os restantes biscoitos no forno, por cerca de 10 a 15 minutos, ou até estarem douradinhos nos bordos.
Deixar tudo arrefecer nos tabuleiros por cerca de 5 minutos, antes de transferir para grelhas, para arrefecimento completo.
Depois de frios, decorar os biscoitos a gosto e com as cores de icing escolhidas.
Arranjar os biscoitos em cima do anel, até obterem o efeito desejado.
Usar o icing branco para colar as costas dos biscoitos ao anel ou, caso prefiram, usem caramelo (façam um caramelo com 200g açúcar refinado branco e 60ml de água fria) como cola.
Depois de colados todos os biscoitos, deixar a coroa repousar até o icing ou o caramelo estarem completamente secos e firmes.


Recipe / Receita: Delicious magazine - December 2015.

2 December 2015

Carob and cinnamon bundt cake / Bundt de alfarroba e canela.


As soon as I saw this cake created by Patrícia (our portuguese Pierre Hermé from the South), I knew it wouldn't take long for me to try it.
I love carob flour and it is an ingredient that brings me lovely memories.
The cake itself is absolutely delicious, very moist and the hint of the cinnamon gives it a fabulous taste.
It really is a cake that you should try and I truly recommend it!


ingredients:
320g plain flour
30g ground almonds
1 tsp baking powder
1/2 tsp bicarbonate of soda
1 tsp fine sea salt
3 eggs, at room temperature
250g caster sugar
200g salted butter, melted and cooled
1 tsp vanilla extract or paste
250g crème fraîche, at room temperature
60g carob flour
1 tbsp Nesquik hot chocolate powder
1 tsp ground cinnamon
icing sugar, to dust
method:
Preheat the oven to 180ºC. Grease a bundt tin and dust with flour and set aside.
Sift the flour, ground almonds, baking powder, bicarbonate of soda and salt and set aside.
In a separate bowl, sift the carob flour with the chocolate powder and the cinnamon and set aside.
Put the sugar, eggs, melted and cooled butter and vanilla inside a bowl of an electric mixer fitted with the whisk attachment and beat on medium high speed until pale, thick and doubled in size.
Reduce the mixer speed to medium and add the carob flour mixture along with the crème fraìche and beat until everything is well combined.
Reduce the mixer speed to low and add the plain flour mixture, stopping as soon as the flour is incorporated into the mixture.
Stop the mixer when the batter is smooth and give it a couple of turns with a rubber spatula, just to make sure none of the ingredients have fallen to the bottom of the bowl and they are all well incorporated.
Pour the batter into the prepared tin and bake for 45 minutes or until a skewer inserted in the middle of the cake comes out clean.
Transfer the cake tin to a cooling rack and cool the cake for 10 minutes before turning it onto the rack to cool completely.
Dust with icing sugar before serving.

__________________

Assim que vi este bolo da Patrícia (a nossa Pierre Hermé do Sul), soube imediatamente que não iria demorar muito a testá-lo na minha cozinha.
Adoro farinha de alfarroba, não só pela cor e sabor que dá aos bolos, mas também porque é um ingrediente que sempre estará relacionado com uma determinada época da minha vida e que, apesar dos pesares, me traz algumas boas recordações e memórias.
Quanto ao bolo, que muito entusiasticamente recomendo, não decepcionou em nada e aqui, nesta cozinha, será repetido muitas mais vezes!!
A textura é húmida no interior como eu gosto, o sabor é maravilhoso e o "travozinho" da canela, torna-o extremamente delicioso, delicado e único!


ingredientes:
320g de farinha de trigo branca
30g de amêndoa moída
1 colher chá de fermento em pó
1/2 colher chá de bicarbonato de sódio
3 ovos, à temperatura ambiente
250g de açúcar
200g de manteiga com sal, derretida e arrefecida
1 colher chá de sal fino
1 colher chá de pasta ou extracto de baunilha
250g de crème fraîche
60g de farinha de alfarroba
1 colher sopa de chocolate em pó (eu usei Nesquik)
1 colher chá de canela em pó
açúcar em pó, para polvilhar
preparação:
Untar uma forma com manteiga e polvilhar com farinha.
Numa taça, peneirar a farinha, a amêmdoa moída, o fermento, o bicarbonato de sódio e o sal e reservar.
Numa taça à parte, peneirar a farinha de alfarroba, o chocolate em pó e a canela e reservar.
Na taça de uma batedeira eléctrica, bater os ovos com o açúcar, a manteiga derretida e arrefecida e a baunilha durante 10 minutos, até obter uma mistura esbranquiçada e volumosa.
Adicionar a mistura da farinha de alfarroba e o crème fraîche e bater em velocidade média, até tudo estar bem incorporado.
Adicionar a mistura da farinha de trigo e envolver tudo muito bem com uma espátula, ou bater em velocidade baixa, só até a mistura estar incorporada.
Deitar a massa na forma e bater com esta na bancada de forma a eliminar as bolhas de ar.
Levar ao forno por cerca de 45 minutos, ou até que um palito inserido no meio do bolo, saia completamente limpo.
Deixar o bolo arrefecer na própria forma por 10 minutos antes de o desenformar.
Desenformar e deixar arrefecer completamente sobre uma grelha.
No momento de servir, polvilhar com açúcar em pó.


Recipe / Receita: Patrícia - Coco e Baunilha.