Showing posts with label Chorizo / Chouriço.. Show all posts

16 October 2019

Chorizo and Black Tapenade Bread / Pão com Chouriço e Pasta de Azeitona Preta.


It feels like AGES! since the last time I've posted something on the blog!
I don't blog for so long that, I can't remember if I still know how to blog :))...
Anyway! It's World Bread Day 2019 and, as I adore bread, I never miss this day or the opportunity and excuse to bake a loaf of bread.
As soon as I got Zorra's invitation, of course, my brain started hitching and I couldn't stop thinking about which bread I'd bake this year.
Chorizo and Olives? Chorizo and the Tapenade (a more exquisite version of olives)?
This combination seemed very obvious, delicious and simple and that's the one I've gone for. Absolutely delicious and simple, Chorizo and Tapenade is the bread I've chosen to celebrate this year's WBD!
Hope you try it and love it as much as we did.

21 November 2017

Rice with Chicken, Farinheira and Chorizo / Arroz de Frango, Farinheira (e chouriço).


“Enchidos” is the Portuguese word for our (many) varieties of cured and/or, dried sausages.
Different kinds of Chorizos, Alheiras and (my favourite of them all), Farinheiras, they all belong to the very ancient and cultural Portuguese tradition of cured or dried sausages and they’re mostly the reason why I can’t, ever! be a pure vegetarian.
Farinheira is a Portuguese smoked sausage made mainly from wheat flour, pork fat and seasonings.
It has a yellow/brown colour and it was invented by Portuguese Jews, in order to have "something" hanging on their smokehouses (faking the consumption of pork), to save them from the Inquisition. It is made with flour, which gives it its name, red pepper paste, paprika, wine and, nowadays, pork fat!
If you never tried a "Farinheira" before, you should run to your nearest Portuguese delicatessen and buy one but, you have to try a very good quality one, like the one I used in this rice, or else, you’ll be disappointed...
One of the things we can't ever leave behind, is any kind of "enchido" and, almost all of our traditional Portuguese dishes include some kind of "enchido" or cured meat.
I'm not complaining. I'm a true lover of this kind of food and all kinds of chorizo, "enchidos", bacon, prosciutto and relatives, they're all on top of the list for my "desert Island food"...
We (Portuguese), we love our "enchidos" as much as we love our rice and, you think of any combination using rice, you name it, and I bet, we will have a traditional recipe for it. From duck rice, shellfish rice, razor clams rice, octopus rice, to salted cod rice, we have them all covered and in a very delicious and traditional way.
"Prato do Dia - Dish of the Day" is the debut cook book from our most beloved Portuguese celebrity cook Filipa Gomes.
Prato do Dia, the name given to the book, is also the name of one the most popular cooking shows in Portugal (24Kitchen - Fox TV) and Filipa Gomes is its hostess.
Her straightforward, flavourful and delicious recipes are a success and her unpretentious way of life and approach to food, are absolutely inspirational.
I’ve had the honour to receive an advanced and signed (by the author herself), copy of the book and honestly, I'm totally in love with it.
Simple, divided in chapters like, Starters and Snacks, Fish and Shellfish, Meat and Desserts, the book is a delight to flick through and full of mouthwatering, simple and easy recipes for every day of the week.
I’m so honored and delighted to have a signed copy of Filipa's book and so thrilled to cook from it!
The recipe I'm sharing today, is the first recipe, tried and totally approved from the book and, as it is so full of Portuguese references and so special and close to my heart, it got to be cooked in one of my beloved "black clay" dishes. A very ancient, manual and traditional, Portuguese pottery from Bisalhães, a village in the North of Portugal.

21 September 2017

Smoky Chorizo Salmon / Salmão com Chouriço e Tomates.


So, Summer is officially over and as a good bye to this Summer homegrown sweet tomatoes, here is another recipe from Jamie Oliver "5 ingredients - Quick & Easy Food".
In this recipe, the tomatoes are combined with crispy skin salmon, smoky chorizo and olives. A fantastic combination, full of Mediterranean flavours.
If you still have some nice and sweet tomatoes left, give this recipe a try because it's truly delicious.

21 March 2017

Jerusalem artichoke and Chestnut Soup with Chorizo and Apple / Sopa de Girassol batateiro e Castanhas, com Chouriço e Maçã.


When you think you add all the possible Jerusalem artichoke soup combinations that can be, and that this kind of soup can't be improved anymore, here comes another fabulous combination that leaves you on your knees. Yes!! and I promise, I'm not exagerating.
Just check under the "soup" label here on the blog and you'll see how many Jerusalem artichoke soups I made already! Not just one, two or three but more than that and all of them, absolutely delicious!
As I had a bag of Jerusalem artichokes in the fridge, as soon as I saw this recipe in one of Chef Maria Elia books, the "Full of Flavour" book, of course, I couldn't hold myself but use them artichokes in this recipe.
No words!!! A true delight and that's another reason why I love this ingredient so much. Absolutely divine!

2 June 2016

Wet rice with chorizo, kale and spinach / Arroz Robusto.


When something is truly delicious, you don't mind having it often right?
Well, that's exactly what happened with this dish.
When I got the gorgeous Mónica Pinto "Pratos e Travessas" cookbook last week, after marking down - almost all the recipes - this one, was the one that I decided that would be the first one to be tested.
The day I got the book, I was in doubt about what to make for dinner and as soon I saw this recipe and read the ingredients, I made it that same day.
The result couldn't be more spectacular but, as it was very late, I didn't take photos. This week, as everybody at home was asking me to make it again (that's how delicious it is), I took my time to take the pictures so I could share the recipe with you all.
I have to say that, in my opinion, is the most beautiful and complete Portuguese Food blog and there's no portuguese food blog that can be compared to hers.
Everything, starting with the recipes, photos, landscape images and the way Mónica writes, is absolutely fascinating.
I still remember the first time I came across Pratos e Travessas. I was so astonished, that it took me some time to realise that it was a portuguese blog and since then, I read the blog and every post, every time Mónica updates it. The recipes, usually, are fabulous and Mónica writes both in portuguese and english and for the photos, I confess, I spend hours, admiring them!!
Saying that, here it is, the first recipe from the absolutely AMAZING, Mónica's debut cookbook, "Pratos e Travessas"!
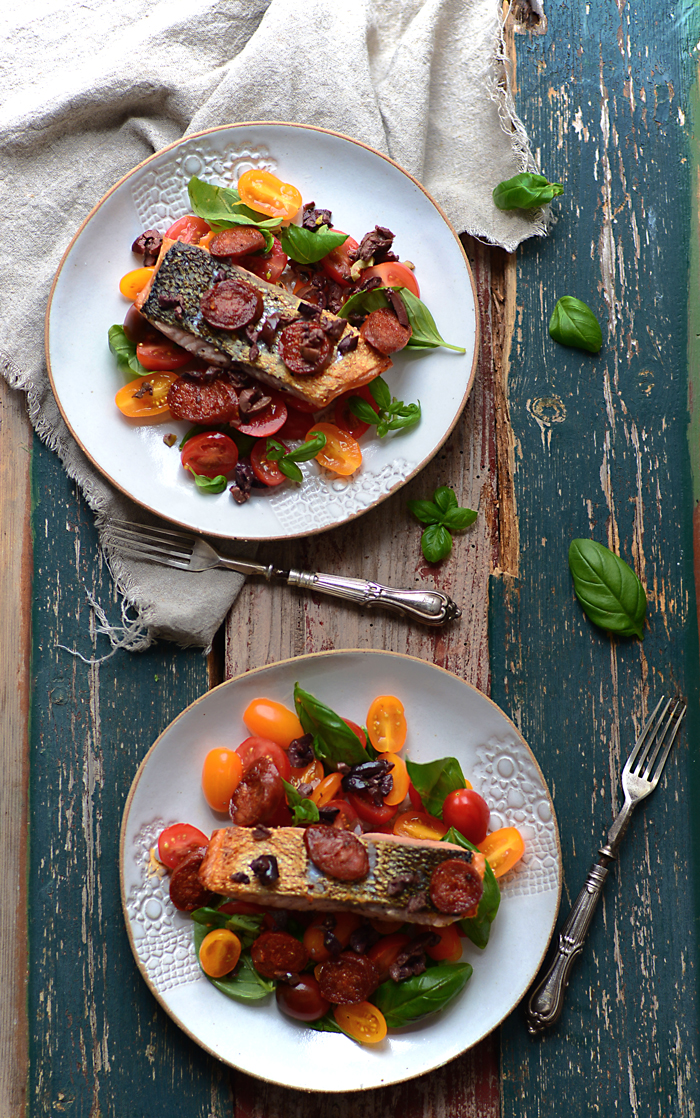
"Arroz Robusto" is the name of the recipe, which is, nothing but a very delicious, comforting and well balanced wet rice dish with all the trimmings that will be named below.


ingredients (serves 4):
3 tbsp olive oil
1 medium onion, finely chopped
2 garlic loves, finely chopped
1 bay leaf
125g chorizo, cut into 1cm rounds
1 medium carrot, thinly sliced
1 big and very ripe tomato, skinless and seedless, chopped
50g baby spinach leaves
100g curly kale, finely shredded
1 x 400g can red kidney beans, drained and rinsed
3 cups chicken or vegetable stock
1/2 cup long grain rice
sea salt flakes and freshly ground black pepper, to taste
method:
Heat the olive oil in a heavy based saucepan.
Add the onion, bay leaf and garlic and cook over a medium heat until the onion is softened and lightly golden brown.
Add the carrot and chorizo and cook for 3 to 4 minutes, stirring occasionally.
Stir in the tomato and cook for 1 minute.
Add the spinach, kale, beans and stock. Stir and bring to the boil.
Add the rice and when it comes back to the boil, reduce the heat to low, cover the pan and simmer until the rice is al dente (about 10 to 12 minutes), stirring from time to time, to release the starch form the rice. When cooked, but al dente, the rice should be very wet. If needed, add more boiling stock or water.
Season with sea salt flakes and freshly ground pepper to taste.
Turn off the heat and allow the rice to rest, covered, for 5 minutes.
Serve immediately.

__________________

Começo por vos dizer que, há anos atrás, quando me deparei pela primeira vez com o blogue Pratos e Travessas, da Mónica Pinto, nem queria acreditar que era um blogue Português.
Não desmerecendo ninguém, claro, acho que o Pratos e Travessas está muito para além,  de todos, e qualquer um, dos blogues de culinária portugueses.
O Pratos e Travessas é, na minha humilde opinião, claro, um blogue completo e que abrange todos os "parâmetros" requeridos para um blogue de culinária de sucesso e não é à toa que é um blogue reconhecido internacionalmente.
Quando me deparei com o Pratos e Travessas pela primeira vez, o que me fascinou à partida, foram as fotos espectaculares e o rustico e "dark mood" das fotos da Mónica que, confesso, amo de paixão (mais que o "light mood").
As receitas, nada deixam a desejar e tenho muitas delas em fila de espera para serem testadas, senão, experimentem a receita da Francesinha da Mónica e digam-me se não é das melhores que já comeram (eu já a fiz cá em casa).
O blogue, por si, "clean" e com estilo e escrito em duas línguas, foi o culminar do meu deslumbre e, desde o dia que conheci o blogue da Mónica que, embora nem sempre (ou quase nunca) comente, acompanho todos os seus "updates" pois é, repito, o blogue de culinária português mais lindo de sempre!
Quando a Mónica anunciou que estava a escrever um livro, fiquei deveras entusiasmada, pois se há livro de blogger portuguesa que eu haveria de encomendar sem hesitar, seria um livro da Mónica Pinto e, assim foi!
Assim que o livro foi publicado, lá arranjei meios de o encomendar, pois distância nunca será impeditivo, desde que se queira muito!
Esta foi a primeira receita a ser testada e, confesso, é a segunda vez que faço este prato cá em casa!
Quando algo é absolutamente delicioso e simples de fazer e a família pede "bis", não é difícil repetir certo?
Pois bem, foi o que aconteceu com esta receita! Recebi o livro - LINDO - da Mónica Pinto, o "Pratos e Travessas", a semana passada. Nesse dia, ainda nem tinha decidido, nem sabia bem o que iria ser o jantar e ao folhear o livro da Mónica, deparei-me com esta receita.
Li os ingredientes, comuns cá em casa, e nem me preocupei mais, pois o jantar estava decidido: Seria o "Arroz robusto" da Mónica.
Foi o jantar desse mesmo dia mas, como já era de noite quando o finalizei e nem fotos tirei, decidi, a pedido dos comensais cá e casa, repeti-lo, pois é tão maravilhoso, simples e com sabores tão tipicamente portugueses que, para nós que estamos fora do País, soube a "céu", como podem imaginar e repetir, não foi de todo um sacrifício, antes pelo contrário!!
Fica então a sugestão para quem quiser experimentar!


ingredientes (para 4 pessoas):
3 colheres sopa de azeite
1 cebola média, picada
2 dentes de alho, picados
1 folha de louro
1 cenoura média, descascada e cortada em rodelas
8 rodelas de chouriço
1 tomate grande, maduro, sem pele nem sementes, cortado em pedaços
50g folhas de espinafres
3 folhas de couve portuguesa (eu usei kale), cortada em pedaços
150g feijão encarnado, cozido (eu usei uma lata pequena, feijão escorrido e passado por água limpa)
sal e pimenta preta moída na altura, a gosto
5 chávenas de café de arroz agulha (eu usei só 1/2 chávena "cup")
o triplo do volume do arroz em caldo de galinha de boa qualidade (eu usei 3 "cups" de caldo de legumes).


preparação:
Aquecer o azeite num tacho.
Adicionar a cebola, o louro e o alho e refogar sobre lume médio, até a cebola estar douradinha.
Adicionar todos os restantes ingredientes, excepto o arroz e deixar ferver por 10 minutos, com o tacho "meio" tapado.
Adicionar o arroz, temperar de sal e pimenta e mexer com um garfo.
Assim que levantar fervura, mexa de novo, baixe o lume para o mínimo e cozinhe, com tampa, por cerca de 12 minutos, mexendo 1 ou 2 vezes durante este período, a fim de libertar a goma do arroz.
Atenção que o arroz deve ficar bem malandro e, caso seja necessário, adicione mais caldo a ferver e rectifique os temperos.
Sirva de imediato.

Recipe / Receita:

12 May 2016

Grilled baby squid with chorizo / Lulas grelhadas com chouriço.


To be truthful, this recipe was made a few months ago but, somehow, it was forgotten in the middle of other recipes, which was a big mistake because it is truly a fabulous and delicious combination.
Another recipe from Luke Nguyen amazing book. This one is from the Basque region.
According to Chef Luke, Basque cuisine is influenced by the abundance of produce from the sea on one side, and the fertile Spanish Ebro Vally on the other.
The combination of ingredients is something that we all know as a treat!
ingredients (serves 4):
125g chorizo in one piece
12 baby squid, cleaned
generous pinch of espelette pepper
1 tbsp extra virgin olive oil
1 tbsp chopped flat leaf parsley
lime wedges, to serve
method:
Heat a chargrill pan to medium high. Grill the chorizo sausage for 4 minutes, turning every now and then to brown all over.
Meanwhile, season the squid with a generous pinch of sea salt and espelette pepper and coat with the olive oil.
Remove the sausages from the grill, then chargrill the squid for 1 minute on each side.
Slice the chorizo and transfer to a serving plate, along with the squid.
Sprinkle with the parsley and serve with lime wedges.
__________________


Para dizer a verdade, esta receita já foi feita há uns mesitos atrás e, não sei como, ficou perdida na pasta dos rascunhos do blogue.
Facto imperdoável, pois é tão deliciosa que seria um desperdício não a publicar.
Mais uma receita fantástica e simples de se fazer, do livro lindo do Chef Luke Nguyen.
Uma receita inspirada na região Basca e que combina sabores simples e ingredientes absolutamente magníficos.
De acordo com o Chef Luke, a cozinha Basca é influenciada, por um lado, pela riqueza e abundância dos produtos do mar e por outro, pelos produtos encontrados na fértil região espanhola do Vale do Ebro.
Lulas e chouriço, mar e terra, numa combinação harmoniosa que todos bem conhecemos e que funciona sempre.
ingredientes (para 4 pessoas):
125g chouriço
12 lulas pequenas, limpas
uma boa pitada de pimenta de espelette
1 colher sopa de azeite extra virgem
1 colher sopa de salsa picada
gomos de lima, para servir
preparação:
Aquecer um grelhador sobre lume média a alto.
Grelhar o chouriço por cerca de 4 minutos, virando de vez em quando, a fim de que fique bem grelhado em todos os lados.
Entretanto, temperar as lulas com sal, a pimenta de espelette e o azeite.
Retirar o chouriço do grelhador e grelhar as lulas por cerca de 1 minuto de cada lado, ou até estarem cozidas.
Cortar o chouriço em rodelas e colocá-las num prato de serviço.
Juntar-lhe as lulas, polvilhar com a salsa picada e servir acompanhado com gomos de lima.

Recipe / Receita:

8 April 2016

Savoury spinach, chorizo and haloumi waffles / Waffles salgadas de espinafres, chouriço e queijo haloumi.


The last issue of Donna Hay magazine is really special for me.
Not just because (as always) is full of delicious and great recipes but also because it features the picture of this pavlova that I posted on instagram.
Being Donna Hay one of my favourite Food Stylists and food idols, I think it's not difficult for you to guess how proud and bursting with joy I was first, when the Donna Hay magazine team asked me permission on instagram to feature it and second, when I saw it published in the amazing and worldwide very well known Donna Hay magazine.
Along with fabulous S'more suggestions and lots of fantastic baked Doughnuts recipes, this issue also features lots of amazing savoury waffle recipes.
As you can imagine, I intend to try them all (waffles, doughnuts and S'mores) as each one looks even more delicious then the previous one.
The first recipe chosen, tested and approved from this issue was these waffles as I have a waffle machine that I only used once, to test this Jamie Oliver recipe.
The final result couldn't be more delicious. We had them for lunch and my kids simply adored them and asked me to make them again.


ingredients for the waffles (serves 2):
225g plain flour, sifted
35g cornflour, sifted
1 tsp baking powder, sifted
1 tsp sea salt flakes
375ml buttermilk
60ml vegetable oil
2 eggs, separated
280g dried chorizo, skin removed and shiny sliced
75g shredded spinach leaves
125g grated haloumi
2 tbsp chopped chives
to finish:
2 tsp extra virgin olive oil
2 eggs
sea salt and cracked black pepper
method:
Place the flour, cornflour, baking powder and salt in a large bowl and mix to combine.
Add the buttermilk, oil and egg yolks and whisk until smooth. Set aside.
In another bowl, whisk the egg whites until stiff peaks form.
Add the egg whites to the flour mixture and gently fold to combine.
Add the chorizo, haloumi, spinach and chives to the batter and fold to combine.
Preheat a lightly greased waffle machine according to the manufacturer instructions.
Cook 1 cup of the waffle batter for 6 to 7 minutes or until golden brown and crisp.
Repeat with the remaining batter to make 4 waffles. Set aside and keep warm.
Heat the oil in a frying pan over high heat.
Add the eggs and cook for 1 to 2 minutes or until just cooked.
Divide half of the waffles between 2 serving plates and top each with an egg.
Sprinkle with salt and pepper and sandwich with the remaining waffles to serve.

__________________

Como já todos sabem e tendo em conta a quantidade de receitas da Donna Hay que já publiquei aqui no blogue, adoro cozinhar, não só dos livros desta autora (já se contam 11 e 1 que vem a caminho...), como também da sua revista bimensal, da qual tenho a assinatura anual.
Este último número da citada revista é muito especial para mim, pois não só e como sempre, vem recheado de receitas fabulosas, mas também porque vem lá publicada a foto desta minha pavlova que, na altura que a fiz, publiquei no instagram.
Ora, sendo a Donna Hay uma das minhas autoras favoritas quer em termos de receitas, quer em Food Styling, não será difícil imaginarem o quão orgulhosa e inchada de felicidade fiquei quando, primeiro, a equipa da revista da Donna Hay me pediu permissão no instagram para publicar a foto na revista e, segundo, quando vi a minha foto, ao vivo e a cores, publicada numa das revistas mais lindas e mundialmente conhecidas certo?
Esta edição vem, não só recheada de fabulosas receitas de doughnuts no forno e S'mores de diferentes feitios, como também traz imensas receitas de waffles salgadas e claro, eu tenciono testá-las todas!!
Tenho uma máquina de waffles que ainda só tinha utilizado uma vez (para fazer esta receita do Jamie Oliver) e agora, pela segunda vez, para testar a primeira receita escolhida desta edição da revista. Estas waffles maravilhosas que serviram de almoço cá em casa e que foram tão apreciadas, que os miúdos pediram logo para lhas fazer de novo.
Experimentem e deliciem-se, pois não se arrependerão!


ingredientes para as waffles (para 2 pessoas):
225g farinha de trigo branca, peneirada
35g Maizena, peneirada
1 colher chá de fermento em pó, peneirado
1 colher chá de flocos ou flor de sal
375ml buttermilk
60ml óleo vegetal
2 ovos, separados
280g chouriço, sem pele e cortado em rodelas muito fininhas
75g folhas de espinafres, picadas grosseiramente
125g queijo haloumi, ralado
2 colheres sopa de cebolinho, picado
para terminar:
2 colheres chá de azeite extra virgem
2 ovos
sal e pimenta preta moída na altura
preparação:
Numa taça, colocar a farinha, a Maizena, o fermento e o sal e combinar tudo muito bem.
Adicionar o buttermilk, o óleo e as gemas de ovo e mexer tudo muito bem até a mistura estar macia. Reservar.
Numa taça à parte, bater as claras em castelo firme.
Adicionar as claras ao preparado anterior e envolver tudo muito delicadamente.
Adicionar o chouriço, os espinafres, o cebolinho e o queijo e envolver delicadamente até tudo estar bem incorporado.
Pincelar ligeiramente a máquina das waffles com óleo e aquecer de acordo com as instruções do fabricante.
Colocar 1 chávena (cup) da mistura, em cada um dos compartimentos da máquina (a minha tem dois compartimentos, por isso dá para fazer 2 waffles de cada vez) e cozinhar por cerca de 6 a 7 minutos, ou até estas estarem bem douradinhas e crocantes.
Reservar as waffles cozinhadas em local quente, enquanto se procede da mesma forma para a restante mistura, por forma a fazer 4 waffles.
Entretanto, aquecer o azeite numa frigideira sobre lume alto e estrelar os ovos a gosto.
Colocar uma waffle em cada prato e colocar um ovo estrelado em cima de cada uma delas.
Temperar o ovo com sal e pimenta e cobrir com as waffles restantes, por forma a obter uma sandes de ovo estrelado.
Servir imediatamente.


Recipe / Receita: Donna Hay magazine (April/May 2016).

10 July 2015

Paella.


Here it is, my first homemade paella!
I love paella and I eat it every time that is possible but I was a bit scared of trying to make one at home. It sounded and looked like something very technical and I was always scared of burning the rice in order to achieve what the Spanish's call the "socarrat" which is the crispy rice at the bottom of the pan.
When I bought the book Tapas Revolution from the very well known Chef Omar Allibhoy and I read his recipe for the paella valenciana, that's when I decided to make this one. Meaning, my very first one.
I have a paella pan that my sister gave me about 2 or 3 years ago and that I had never used so, pan sorted, using the ingredients I had at home and following Chef Omar instructions for the cooking method, I can say now and according to the final result and all the positive comments that this paella received that it was a great success and the paella "panic" is now demystified and more paellas will come.

Chef Omar tips in order to make a good paella:
  • Use good quality Spanish ingredients
  • Get yourself a good paella pan
  • Never stir the rice. Ever! You will mal e the rice release starch and it will become too stodgy. At the end of the cooking time the rice should be light, soft and not sticky.
  • Let it rest for 5 minutes at the end of the cooking time. The rice should not be soupy so give it a chance to absorb any trapped steam.
  • Follow the recipe
  • If you have some rice left in the paella pan, remove it to a plate otherwise it will take on a metallic taste.

ingredients (serves 6):
1g saffron
1 tbsp salt
8 tbsp extra virgin olive oil
1kg chicken pieces (I used drumsticks and thighs)
125g chorizo, sliced
300g asparagus, trimmed and thickly sliced
125g green peas, fresh or frozen
4 garlic cloves, finely chopped
1 can (400g) chopped tomatoes
1/2 tsp sweet pimentón
2 l chicken stock
2 roasted red peppers from a jar, thickly sliced
500g spanish paella rice (Bomba or calasparra rice)
1 spring rosemary
1 handfull mussels, cleaned
method:
Wrap the saffron in foil and toast it for 30 seconds on each side in a paella pan over a medium heat. Remove from the pan and set aside.
Increase the heat to the maximum and season around the edges of the pan with the table salt. Wait until the pan is really hot and then drizzle with the olive oil. It should start smoking immediately.
Throw in the pieces of chicken and fry the meat until nicely browned on all sides.
Add the chorizo slices, asparagus and peas and stir together for 1 minute before adding the garlic. Cook for 1 minute and then add the tomatoes, pimentón and toasted saffron.
Cook for 4 minutes, stirring all the time, until you can see that the tomatoes have lost most of the juice and changed colour.
Add the chicken stock and leave to simmer for about 5 to 10 minutes, allowing the bits of caramelised chicken and vegetable on the bottom of the pan to dissolve so you get a rich stock.
Check the seasoning and if it tastes quite salty at this stage, it's ok, as the rice will absorb a lot of saltiness.
Add the rice, spreading it evenly over the paella pan and stir just once. Cook a on the highest heat for about 10-12 minutes before reducing the heat right down and cooking for a further 5-7 minutes.
Once you have added the rice and given it a good stir you shouldn’t touch the pan with a spoon again. When the water is at a lower level than the rice itself, lay the roasted peppers on top of the rice, add the mussels and the rosemary spring.
If the layer of rice on the top starts to look a bit crispy, cover the paella pan with a layer of newspaper for the last 5 minutes of cooking. This will help to steam the grains on top while the bottom gets crispy (the "socarrat").
Once the paella is finished it should look like a completely flat layer of rice.
Leave to rest for 5 minutes before serving.

__________________

Embora já tenha um tacho para fazer paella há uns 2 ou 3 anos, altura em que a minha querida irmã mo ofereceu, nunca tinha tido coragem de fazer paella em casa.
Adoro paella e como-a sempre que possível, mas fazer em casa, era algo que me assustava, pois a tão famosa "socarrat", ou seja, o arroz crocante que deverá formar-se no fundo da panela, era algo que eu achava impossível de obter e sempre tive medo de acabar com um tacho de arroz queimado...
Quando comprei o livro "Tapas Revolution" do bem conhecido Chef Omar Allibhoy, li a receita da sua paella valenciana atentamente e foi aí que me enchi de coragem para avançar para mais uma aventura culinária. A paella!
Assim sendo e utilizando apenas ingredientes que tinha em casa, segui metodicamente e à risca, as instruções de confecção do Chef Omar e o resultado foi uma paella maravilhosa que recebeu inúmeros e os mais positivos elogios e que me deu confiança suficiente para continuar a testar e a fazer diferentes tipos de paella.
Desmistificado o mistério da paella e da "socarrat", aqui vos deixo então a minha versão de paella, seguindo à risca, como acima escrevi, as instruções do Chef Omar.

Conselhos do Chef Omar para obter uma paella perfeita:
  • Usar sempre produtos espanhóis da melhor qualidade
  • Comprar uma boa panela para fazer paella
  • NUNCA mexer o arroz. Ao mexer, o arroz liberta goma e o resultado final nunca será perfeito. Terminado o tempo de cozedura, o arroz deverá estar com uma consistência leve, e macia e nunca peganhento.
  • Deixar o arroz repousar por 5 minutos depois de terminado o tempo de cozedura, para que o arroz absorva todo o vapor condensado.
  • Seguir sempre a receita à risca
  • Se sobrar paella, retire-a do tacho onde cozeu e guarde-a num recipiente de fecho hermético, pois se o deixar no tacho, poderá ganhar um sabor metálico.

ingredientes (para 6 pessoas):
1g açafrão
1 colher sopa de sal
8 colheres sopa de azeite extra virgem
1kg frango em pedaços (eu usei coxas e sobre coxas)
125g chouriço, em rodelas
300g espargos verdes, arranjados e cortados em 3 ou 4 peças
125g ervilhas, frescas ou congeladas
4 dentes de alho, picados muito finamente
1 lata de 400g de tomate picado
1/2 colher chá de pimentão doce
2 l caldo de galinha
2 pimentos vermelhos assados (de frasco), cortado em fatias grossas
500g arroz espanhol (Bomba ou calasparra)
1 haste de alecrim
1 punhado de mexilhões, limpos e bem lavados
preparação:
Embrulhar o açafrão em folha de alumínio e tostá-lo sobre lume médio, dentro da panela da paella, por 30 segundos de cada lado. Retirar o açafrão da panela e reservar.
Aumentar o lume para o máximo e espalhar o sal nos lados da panela, junto às paredes da mesma.
Quando a panela estiver muito quente, adicionar o azeite. A panela tem de estar mesmo muito quente, para que o azeite comece a fumegar imediatamente.
Adicionar o frango e fritar bem de todos os lados para que o frango fique bem corado.
Adicionar as rodelas de chouriço, as ervilhas e os espargos e mexendo, cozinhar por cerca de 1 minuto.
Adicionar o alho e cozinhar por mais 1 minuto.
Adicionar os tomates, o açafrão tostado (sem o papel de alumínio claro) e o pimentão. Cozinhar por cerca de 4 minutos, ou até o molho do tomate ter evaporado, mexendo sempre.
Adicionar o caldo de galinha e deixar cozinhar por ceca de 5 a 10 minutos, a fim de que o frango e os legumes caramelizados no fundo da panela se soltem e enriqueçam o caldo.
Provar de sal e se, a esta altura, estiver bastante salgado é bom sinal, pois o arroz absorverá esse excesso de sal.
Adicionar o arroz, espalhando-o pela superficie da panela e mexer uma vez só!
Cozinhar em lume alto (máximo), por 10 ou 12 minutos e depois baixar o lume para o mínimo e cozinhar por mais 5 a 7 minutos.
Quando o caldo estiver a um nível inferior ao do arroz, espalhar as tiras de pimento sobre a superfície do arroz, assim como os mexilhões e o alecrim.
Caso nos últimos 5 minutos de cozedura, o arroz que está à superfície comece a ficar muito seco, tapar a paella com uma camada de jornal. Este processo ajudará a que os grãos de arroz cozam uniformemente na superfície, enquanto no fundo da panela se forma a tão famosa "socarrat".
Terminado o tempo de cozedura, o resultado final deverá ser liso, ou seja, uma camada lisa de arroz e não montanhas ou montes aqui e ali.
Deixar o arroz repousar por 5 minutos antes de servir.


Recipe / Receita: Adapted from:

6 April 2015

Caldo Verde.


Caldo verde is a very traditional portuguese cabbage soup.
In our traditional recipe, the base of the soup is a potato purée and the cabbage is cut into a very, very fine chiffonade. One slice of cooked chorizo will be added at the end and will be found at the bottom of the mug or bowl.
I love when I find portuguese inspired recipes in cook books that are not portuguese and this version of the portuguese caldo verde, comes in this fabulous book.
I have to tell you that, although I love the traditional portuguese caldo verde, this version is more to my liking as it is made and presented in a very rustic, hearty and chunky way.
ingredients (serves 2):
1/2 tbsp unsalted butter
1/2 onion, finely chopped
1 garlic clove, finely chopped
1/2 tbsp olive oil
1 leek, halved lengthways and thinly sliced
1 potato, cut into 1cm cubes
1/2 tsp paprika
600ml vegetable stock, hot
1/2 tbsp tomato purée
50g cooking chorizo, cut into 1cm cubes
50g kale, hard stems removed and leaves shredded
extra virgin olive oil, to drizzle
sea salt flakes


method:
Heat the butter in a saucepan. Add the onion and cook gently for a few minutes. Add the garlic and cook for a further 2 minutes.
Add the olive oil and leek and cook for 5 minutes, or until the leek is soft.
Add the potato, salt and paprika and cook, stirring well, for a couple of minutes.
Add the stock and tomato purée and bring to the boil. Reduce the heat and cook until the potatoes are almost tender.
Add the kale and cook for about 5 minutes, or until tender. Season with salt.
Heat a skillet or frying pan over medium heat. Add the chorizo and fry until slightly crispy. Set aside.
Ladle the soup into bowls and top with the fried chorizo and a drizzle of extra virgin olive oil.
__________________

O nosso português caldo verde dispensa apresentações entre nós certo?
Adoro quando encontro receitas portuguesas ou inspiradas em receitas portuguesas, em livros estrangeiros e foi o caso deste caldo verde que encontrei neste livro magnífico.
Tenho a dizer que, embora seja grande apreciadora do nosso caldo verde, cortado fininho e com a base de puré de batata, esta versão foi uma muito, muito agradável surpresa, pois eleva o nosso caldo verde a uma dimensão um bocadinho superior e dá-lhe mais sabor e textura.


ingredientes (para 2 pessoas):
1/2 colher sopa de manteiga sem sal
1/2 cebola, finamente picada
1 dente de alho, finamente picado
1/2 colher sopa de azeite
1 alho francês, cortado ao meio no sentido do comprimento e finamente fatiado
1 batata, cortada em cubos de 1cm
1/2 colher chá de paprika
600ml caldo de legumes, quente
1/2 colher sopa de concentrado de tomate
50g chouriço, cortado em cubos de 1cm
50g couve portuguesa, talos grandes removidos e folhas esfarripadas
azeite extra virgem, para regar
flor ou flocos de sal
preparação:
Derreter a manteiga numa panela. Adicionar a cebola e cozinhar por uns minutos. Adicionar o alho e cozer por mais 2 minutos.
Adicionar o azeite e o alho francês e cozinhar por 5 minutos, ou até este estar macio.
Adicionar as batatas, o sal e a paprika, mexer bem e cozinhar por uns minutos.
Adicionar o caldo de legumes e o concentrado de tomate e mexer. Quando levantar fervura, baixar o lume, e cozinhar até que as batatas estejam quase cozidas.
Adicionar a couve e cozer por cerca de 5 minutos, ou até esta estar macia. Temperar de sal.
Entretanto, numa frigideira bem quente, mas sem adicionar nenhum tipo de gordura, fritar os cubos de chouriço até estarem douradinhos.
Servir a sopa em tigelas, com o chouriço por cima e regar com um fio de azeite.

Recipe / Receita: