Showing posts with label Seeds / Sementes.. Show all posts

23 October 2017

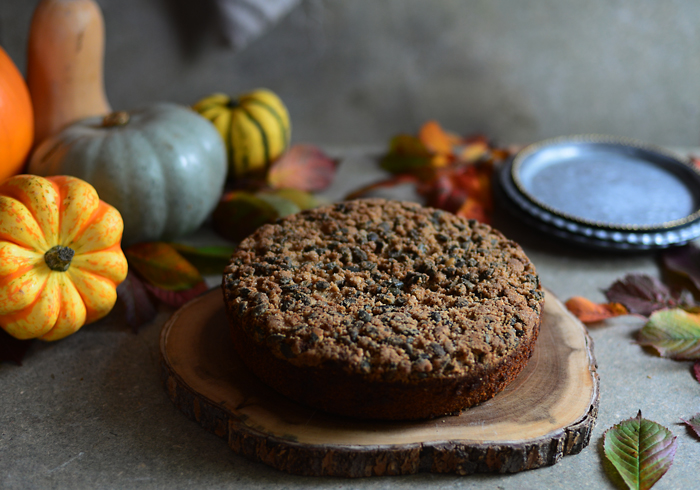
Pumpkin Cake with Browned Butter Streusel for the Virtual Pumpkin Party / Bolo de Abóbora com Streusel de "Beurre Noisette" para a Festa Virtual da Abóbora.


It's Virtual Pumpkin Party Day again and I so love to cook with pumpkin, that I couldn't miss this day for anything in the world!
Last year I created this fabulous Pumpkin and Coconut Caramel Flan to celebrate the day but, this year, as I have so many things up to my sleeve, I decided to make a recipe from one of my favourite books at the moment!
This cake is any "pumpkin lovers" dream as it's moist, full of spicy and autumnal flavours and totally perfect for these autumnal days.!
The recipe s from Brian Hart Hoffman "Bake from Scratch" cook book and it's a real delight.
I have to say that the browned butter streusel topping is just to die for so, in case you want to give this gorgeous and delicious cake a go, here is the recipe and..., just in case you want to have a look and check all the fabulous bloggers that are celebrating this day and all the fantastic delights they cooked, check Sara's blog and enjoy the pumpkin feast.


26 May 2017

Spiced Carrot Purée (Dip) with Dukkah / Puré (Dip) picante de Cenouras com Dukkah.


Last recipe for Marta, May and Carrot as the ingredient of the month!
This recipe, another one from Chef
Maria Elia "Full of Flavour" book is absolutely divine to serve at a dinner party as a canapé or as part of a mezze.
Everybody can help themselves and dip the chosen bread in the carrot dip, while enjoying their drinks or cocktails.
ingredients (serves 8):
for the dukkah:
100g almonds, blanched
50g coriader seeds
20g cumin seeds
75g sesame seeds
sea salt and freshly ground black pepper
method:
Toast the almonds in a medium pan over a medium heat until golden.
Transfer the almond to a work surface to cool a little, then finely chop them.
Transfer to a bowl.
Add the coriander and cumin seeds to the pan and toast for 2 minutes, or until fragrant. Transfer to a pestle and mortal, leave to cool completely, then coarsely grind and mix with the almonds.
Toast the sesame seeds until golden. Leave to cool, then grind, together with 2 tsp of sea salt.
Add to the almond mixture and season with black pepper.


15 May 2017

Vegan Chocolate Granola / Granola vegan de Chocolate.


If you're following this blog for some time now, you know that I'm not vegan, vegetarian, Paleo or whatever.
I'm just someone that loves food in general!
I eat everything (well, not quite...) and I love to try all sorts of flavours and cuisines. I believe that in food just as in life, balance is the key for everything and therefore, in my house there's no place for fanaticism, fundamentalism's and other sort of (isms).
I cook and eat with my family and friends whatever we fancy to eat on the day. If it's meat we'll eat meat, if it's vegetarian will be and if it's vegan or other sort of tendency, it will be but, it's always what we want, when we want.
Saying that, I love vegan food more than I ever thought I would love it and although (as you know), I have lots of all sorts of books, when I'm craving vegan food, I always go to that same place where I know that I'll find fabulous, mouthwatering and delicious vegan recipes.
Weather for breakfast, meals or even vegan cakes and sweets, Kimberly's, The Little Plantation Blog is the place I always rely in order to cook and eat fabulous vegan food.
Not to talk about Kimberly, the blog owner herself. Such a thoughtful and kind person. Full of knowledge and a very talented food and prop stylist and photographer...
Just visit the blog and tell me if you don't want to cook everything Kimberly publishes there? Plus! Kimberly's blog posts are always a joy to read. Short or long, whatever the theme, for me, reading them, it's always a delightful and relaxing moment!
Honestly? If there is one person in this world that could make me go completely vegan, that person would be Kimberly and her blog!
I've already tried lots of Kimberly's recipes here at home and although my daughter and I, we are the keenest ones for vegan food, my husband and teenager son never ever complained about any of the recipes I cooked from The Little Plantation blog.
Actually, all of them were very much appreciated and devoured by everybody including the two fussy boys.
This granola is one of those successful recipes I tried from Kimberly's blog and I'm not writing here the English version of it because it's all written down and very well explained here.
I have to say that after taking the granola out of the oven, I couldn't stop munching it from the tray or even after being cooled, directly from the jar.
My kids (both), are having it for breakfast and snack all the time and soon, I'll have to make another batch.
Yes! That's how delicious it is!!

5 March 2017

Kale and Quinoa with Savoury Granola / Kale e Quinoa com Granola Salgada.


Breakfast food that you know, for me is a perfect lunch!
As I promised here, today I'm sharing this super delicious savoury granola.
Actually, I made this recipe a while ago and if you're following my instagram, you can see it here, as I shared it the day I made it. Although I'm only sharing it today, this was the very first recipe that I made from Nina Olsson gorgeous "Bowls of Goodness" cook book. A book that I truly adore and from which I talked about in this same post.
This savoury granola is perfect, not just for this recipe but also to sprinkle over salads, soups, or whatever you fancy.

22 February 2017

Rose and Pistachio Granola / Granola com rosas e pistachios.


Today and because I'm in a kind of "rose recipes" mood, I'm sharing the first recipe from Nina Olsson AMAZING book "Bowls of Goodness".
This is the first recipe I'm sharing here on the blog, but not the first I made from Nina's book. No! I already made lots of delicious recipes, that I'll be sharing here soon.
Nina's book is the most delightful vegetarian (with vegan and gluten free options) book I have.
You know the kind of book that you just want to be in the kitchen and cook your way through it? Well, Nina's book is one of that kind...
"Nina's book IS NOT just another "avocado on toast" or average vegetarian cook book and believe me, because I have over 600 cookbooks and a good share of them are vegetarian and vegan.
Bowls of goodness is a thoughtful book, full of captivating images, colourful and appetising recipes. Balanced and very well written recipes that makes me (a meat eater trying to eat less meat), become vegetarian!
I got my copy on Saturday and honestly, since then, I can't stop reading it or cooking from it. One, after the other, I just want to cook all the recipes from the book and I'd say that there's no better sign of how good a book is.
Do I recommend it?
Even for meat eaters like myself?
YES! A 100%!!"
So, today, the recipe I'm sharing with you, is Nina Olsson, Bowls of Goodness, Rose and Pistachio Granola.
A granola that, after the first time I made it, quickly became the favourite one here at home and I'm making it weekly now.
Oh, and by the way..., just wait until I share with you the next recipe which will be Nina's Savoury Granola...
You'll be totally in love with it but..., you have to wait a few more days...

10 January 2017

Espresso Granola / Granola de Café.


After all the December excesses, we all need a little food cleansing this month and so, for January and the most needed detox and clean start, I'm leaving you with this delicious and very flavoursome granola.
The recipe is from Donna Hay "Life in Balance" cookbook and the coffee flavour is a very pleasant surprise.

5 October 2015

Harissa waffles, sesame fried eggs and carrot salad / Waffles de harissa, ovos estrelados com sementes de sésamo e salada de cenoura.


I know that breakfast is the most important meal of the day but I've never been a breakfast girl.
Since early age, the maximum that I can eat in the morning is a piece of fruit or a fruit or green juice/smoothie and nothing else. Big continental or british breakfasts are not for me but, saying that, I have to confess that I love breakfast food.
My favourite chapters in cookbooks are precisely the breakfast chapters and although I can't have this kind of food in the morning, I love it for lunch or even for a midweek lazy dinner.
The recipe I'm leaving you today is from the breakfast chapter of Jamie Oliver new cookbook and it made a fabulous early dinner for my kids and myself. The combination of flavours and textures is fabulous and utterly delicious.
ingredients (serves 2):
100g wholemeal self-raising flour
1 tbsp poppy seeds
2 tsp harissa
3 large eggs
100ml semi-skimmed milk
sesame oil
sesame seeds
1 large carrot
50g baby spinach
1 pomegranate, seeds and juices
2 sprigs of fresh mint, leaves separated
to serve:
2 tablespoons fat-free natural yoghurt
hot chilli sauce


method:
Preheat the waffle iron.
In a bowl, mix the flour, poppy seeds, harissa and 1 egg together.
Gradually add the milk, whisking until combined, and season with sea salt and black pepper.
Brush the waffle iron with a minimal amount of sesame oil, then sprinkle half a teaspoon of sesame seeds into each side, followed by a quarter of your waffle mixture.
Cook the waffles for a few minutes, or until golden and cooked through.
Meanwhile, peel and matchstick the carrot and place in a bowl.
Finely slice the spinach and add them to the bowl.
Add the pomegranate seeds and their juices to the bowl.
Add the mint leaves to the bowl and toss everything together.
Drizzle a small non-stick frying pan on a medium heat with oil, then wipe around and out with kitchen paper. Crack in 1 of the remaining eggs, sprinkle with a pinch of sesame seeds, then cover the pan to set the top of the egg and cook to your liking.
Serve the waffles with the salad, the sesame fried egg, a dollop yoghurt and a good shake of chilli sauce.
__________________


Depois de uns dias de férias em família, que souberam a "céu" e de uns outros tantos de introspecção, o blogue está de volta à sua rotina habitual e focado no objectivo para o qual foi criado, ou seja, partilha de receitas!!
Não pretendo ser famosa, não pretendo escrever livros de receitas e não aspiro a aplausos e palcos de deslumbramento.
No dia que decidir dedicar-me a algo de sério relacionado com a culinária, concorro ao Masterchef, pois aí sim, é que realmente se conclui e se percebe quem sabe, de facto, alguma coisa sobre culinária!
Há umas 3 semanas atrás, vi uma frase num perfil do instagram que dizia "Just trying to be a good girl, in a world full of bad nasty bitches" e sinceramente, esta frase não podia vir mais a propósito no momento...
Enfim..., em frente que atrás vem gente, deixo-vos hoje com a primeira receita que fiz do novo livro do Jamie Oliver.
Embora esta receita faça parte do capítulo dos pequenos almoços, eu nunca fui de grandes pequenos almoços.
Desde tenra idade, o máximo que consigo ingerir de manhã é uma peça de fruta, ou um sumo/batido de fruta.
Dito isto, confesso que os capítulos dos pequenos almoços, são os capítulos que mais adoro nos livros de culinária, pois adoro comida de pequeno almoço, mas para comer ao almoço, ou até mesmo ao jantar!
Asim sendo, deixo-vos esta deliciosa receita de comida de pequeno almoço, que foi um belíssimo jantar para mim e para as minhas crianças.
ingredientes (para 2 pessoas):
100g farinha de trigo integral com fermento
1 colher sopa de sementes de papoila
2 colheres chá de harissa vermelha
3 ovos grandes (L)
100ml leite meio gordo
óleo de sésamo
sementes de sésamo
1 cenoura grande
50g folhas de espinafre bebé
bagos e o sumo de 1 romã
folhas de 2 pés de hortelã menta
para servir:
2 colheres sopa de iogurte natural magro
molho picante (eu usei sweet chilli sauce)


preparação:
Aquecer a máquina de fazer waffles.
Numa taça, misturar a farinha, as sementes de papoila, a harissa e o ovo.
Adicionar o leite, um bocadinho de cada vez, mexendo bem até obter uma mistura macia e temperar de sal e pimenta.
Pincelar a máquina das waffles com o mínimo possível de óleo de sésamo e salpicar ambos os lados com sementes de papoila.
Colocar colheradas da mistura na máquina, sem encher demasiado, por forma a fazer waffles mais pequenas.
Cozinhar as waffles até estarem douradinhas de ambos os lados e o interior estar cozido.
Entretanto, descascar a cenoura e cortá-la em palitos fininhos ou ralá-la. Colocar a cenoura numa taça.
Cortar as folhas de espinafres em tiras e adicionámos à taça.
Adicionar os bagos da romã e o sumo que tiver conseguido espremer da mesma.
Adicionar as folhas de hortelã menta e envolver tudo muito bem.
Colocar uma frigideira anti aderente sobre lume médio e com a ajuda de uma folha de papel absorvente de cozinha, esfregá-la com azeite ou óleo.
Partir 1 ovo na frigideira e salpicá-lo com sementes de sésamo. Repetir, de acordo com o número de pessoas que vai servir, servindo 1 ovo por pessoa.
Tapar a frigideira com uma tampa e deixar o ovo cozinhar, por forma a que a clara fique bem cozida, mas a gema fique mole.
Servir as waffles com a salada, o ovo estrelado, o iogurte e o molho picante.

Recipe / Receita:

13 April 2015

The Kitchn granola / Granola do livro The Kitchn.


Granola is something that I love to make and I'm always trying to make different versions.
Sometimes when I'm feeling lazy I buy it as now, we can find some fabulous and healthy brands and options on the market.
This recipe is fabulous and full of fantastic ingredients.
ingredients (makes around 6 cups):
3 cups rolled oats
1 cup chopped nuts (almonds, pecans, walnuts)
1 cup dried, shredded, unsweetened coconut
1/2 cup seeds (sesame, pumpkin)
1/2 cup light brown sugar
1 1/2 tsp salt
1/4 tsp ground cinnamon
1/2 cup oil (light olive oil or walnut oil)
1/2 cup honey or maple syrup
3/4 tsp vanilla extract
2 egg whites, lightly beaten
3/4 cup chopped dried fruit (cherries, cranberries, apricots, blueberries)
method:
Preheat the oven to 150ºC.
In a large bowl, mix the oats, nuts, coconut, seeds, sugar, salt and cinnamon.
In a small bowl, whisk together the oil, honey or maple syrup and vanilla.
Pour the liquid mixture into the dry mixture and stir to combine.
Add the egg whites and combine throughly.
Scrape the mixture out onto a sheet pan and bake for about 45 to 50 minutes or until the mixture is light brown and toasty.
Stir after 20 minutes, moving the crispy bits from the perimeter into the center and distributing the granola in the center out toward the edge of the pan.
Remove the pan from the oven and add the dried fruit.
Using a spatula, stir to combine the mixture and let the granola cool.
Transfer to an airtight container.
The granola will keep fresh for 7 to 10 days.
__________________


Granola é algo que adoro fazer e tento fazer sempre receitas diferentes, pois gosto de variar sabores e combinações.
Quando a preguiça ataca, compro granola de pacote, pois felizmente, hoje em dia já se conseguem encontrar no mercado, marcas com opções magníficas e saudáveis.
ingredientes (rende cerca de 6 chávenas):
3 chávenas de flocos de aveia
1 chávena de frutos secos (amêndoas, nozes, pecãs, etc.)
1 chávena de coco seco ralado, sem adição de açúcar
1/2 chávena de sementes (papoila, sésamo, abóbora, etc.)
1/2 chávena de açúcar amarelo ou moreno claro
1 1/2 colheres chá de sal
1/4 colher chá de canela em pó
1/2 chávena de óleo (azeite light ou óleo de noz ou outro à escolha)
1/2 chávena de mel ou maple syrup
3/4 colher chá de extracto de baunilha
2 claras de ovo, ligeiramente batidas
3/4 chávena de frutos secos picados (cerejas, alperces, mirtilos, arandos, etc.)
preparação:
Aquecer o forno a 150ºC.
Numa taça grande, misturar os 7 primeiros ingredientes.
Numa taça à parte, misturar o óleo, o mel ou maple syrup e a baunilha.
Adicionar os ingredientes líquidos aos sólidos e misturar tudo muito bem.
Adicionar as claras de ovo e mexer tudo muito bem, a fim de que todos os ingredientes fiquem bem incorporados.
Deitar a mistura para dentro de um tabuleiro de ir ao forno, por forma a que fiquem bem espalhados e levar ao forno por cerca de 45 a 50 minutos, ou até a granola estar douradinha.
Mexer ao fim dos primeiros 20 minutos, movendo a combinação do centro do tabuleiro para as extremidades e vice versa.
Retirar o tabuleiro do forno e adicionar os frutos secos picados.
Misturar bem com a ajuda de uma espátula e deixar arrefecer.
Transferir a granola para um recipiente de fecho hermético.
A granola conserva-se fresca por 7 a 10 dias.

Recipe / Receita:

21 November 2014

Cheddar cheese biscuits / Biscoitos de queijo Cheddar.


For this month's "lets make cookies" challenge, Manuela asked for savoury cookies.
Even if I do love to make desserts, puddings and all sorts of sweet things, what I really love to eat is savoury stuff so, as soon as I saw the theme, I was very happy with it and I made these Cheddar cheese biscuits.
ingredients (makes around 40 biscuits) :
3 cups flour
1 1/2 tbsp baking powder
1 tbsp sugar
2 1/4 tsp salt
2 1/2 cups double cream
1 cup grated aged Cheddar cheese
3 tbsp butter, melted and slightly cooled


method:
Preheat the oven to 190ºC.
Whisk together the flour, baking powder, sugar and salt in a bowl.
Add the cream and cheese and stir gently with a spoon, mixing just until the dough holds together.
Turn out the dough onto a floured surface and knead just enough to incorporate the cream and cheese into the flour mixture.
Roll out the dough about 2.5cm thick.
Cut with a 5cm biscuit cutter.
Place the biscuits about 5cm apart on a baking sheet, then set aside for 10 minutes in order to rest the dough.
Brush the biscuits tops with the cooled melted butter and bake for 20 minutes or until golden brown.
Cool the biscuits on a wire rack.
Note: Before they went into the oven, I sprinkled half of my biscuits with sumac and the other half with Nigella seeds but that is totally optional and to your own taste.
__________________


Para o "vamos fazer bolachas" deste mês, o tema escolhido foram bolachas salgadas.
Embora eu adore fazer bolos, doces e sobremesas, se me derem a escolher, para eu própria comer, entre um doce e um salgado, podem apostar que eu escolherei comer o salgado, pois adoro salgados em geral e sandes em particular.
Bom, isto para dizer que, assim que li que o tema escolhido, fiquei super feliz e fui logo fazer estas bolachinhas de queijo Cheddar.
Caso não encontrem Cheddar, podem optar por outro tipo de queijo. Um queijo da Ilha por exemplo, funcionará lindamente nestas bolachas.
ingredientes (para cerca de 40 bolachas) :
3 chávenas de farinha de trigo branca
1 1/2 colheres sopa de fermento em pó
1 colher sopa de açúcar refinado branco
2 1/4 colheres chá de sal
2 1/2 chávenas de natas para culinária
1 chávena de queijo Cheddar (ou outro à escolha), ralado
3 colheres sopa de manteiga, derretida e ligeiramente arrefecida


preparação:
Aquecer o forno a 190ºC.
Numa taça, misturara a farinha, o sal, o fermento e o açúcar.
Adicionar as natas e o queijo ralado e mexer com uma colher, até a massa se juntar.
Colocar a massa sobre uma superfície enfarinhada e amassar o suficiente, pra incorporar bem todos os ingredientes. É importante não amassar demais.
Esticar a massa até obter uma espessura de 2.5cm e com um cortador de bolachas de cerca de 5cm, cortar as bolachas e colocá-las num tabuleiro de ir ao forno, tendo o cuidado de as espaçar cerca de 5cm entre si.
Deixar as bolachas repousar por cerca de 10 minutos.
Pincelar o topo das bolachas com a manteiga derretida e levar ao forno por 20 minutos, ou até estarem douradinhas no topo.
Arrefecer sobre uma grelha.


Nota: Eu optei por salpicar as minhas bolachas, umas com sumagre e outras com sementes de Nigella antes de as levar ao forno e ficaram magníficas, mas este passo é opcional e ao gosto de cada um.

Recipe / Receita:

30 June 2014

Mushroom and chive quiche / Quiche de cogumelos e cebolinho.


Spring and Summer are the times of the year that I enjoy most to bake quiches and savoury tarts, not just because they are easy to prepare, but also because with a quiche and a little salad, you have a very complete and delicious meal in almost no time at all.
This quiche is a delicious combination of ingredients and as soon as the chives are in bloom, you really want to make this fabulous tart, just to use them and show off their beautiful flowers.


ingredients (serves 4 to 6):
for the pastry:
260g plain flour, plus extra for rolling
60ml olive oil
1 tsp fine sea salt
1 tbsp sesame seeds, toasted
1 tbsp poppy seeds
1 large egg, organic preferably
60ml cold water
method:
In a bowl, combine the flour, salt and seeds. Add the olive oil, egg and water and mix them with a fork.
Turn the dough out onto a lightly floured surface and knead lightly until it comes together into a ball.
Grease a 28 to 30cm quiche tin with olive oil.
Dust the dough with flour and roll out into a round large enough to fit the tart pan.
Transfer the dough to the prepared tin and line it neatly and prick the dough all over with a fork.
Place the tin in the fridge for 30 minutes or up to 1 day.


for the filling:
1kg brown mushrooms or a mix of varieties
1 medium onion, finely sliced
fine sea salt
freshly ground pepper
olive oil, for cooking
3 large eggs, preferably organic
80ml double cream
120ml milk (not skim)
1 tbsp Dijon mustard
2 tsp paprika
1/2 cup chives, finely chopped
method:
Trim the mushrooms and cut into quarters or bite size chunks.
Heat a drizzle of olive oil in a large frying pan over a medium heat.
Add the onion and 1/4 tsp of salt and cook, stirring often, until softened.
Add the mushrooms and 1/2 tsp of salt and cook, stirring from time to time, until the mushrooms release their water, about 5 minutes.
Increase the heat and simmer for a few more minutes, just enough for the excess liquid to evaporate.
Preheat the oven to 160ºC.
Remove the tart tin from the fridge and bake for 20 minutes.
Meanwhile, in a medium bowl, combine the eggs, cream, milk, mustard, paprika, 1/2 tsp salt and some black pepper.
Remove the tin from the oven, and increase the temperature to 175ºC.
Spread the mushroom mixture over the tart crust, sprinkle with the chives and pour in the egg mixture.
Bake for around 45 minutes or until set and lightly golden.
__________________


Quando chega a esta altura do ano, adoro fazer tartes e quiches salgadas, pois são refeições práticas e que, acompanhadas por uma salada, satisfazem plenamente.
Esta tarte foi feita numa altura em que o cebolinho do jardim estava florido e quase que dá pena deixar as flores caírem ou secarem e não as utilizar, de tão lindas que são.
ingredientes (para 4 a 6 pessoas):
para a massa:
260g farinha de trigo branca + extra para a bancada
60ml azeite
1 colher chá de sal fino
1 colher sopa de sementes de sésamo, tostadas
1 colher sopa de sementes de papoila
1 ovo grande, de preferência biológico
60ml água fria
preparação:
Numa taça, combinar a farinha, as sementes e os al. Adicionar o azeite, o ovo e a água e misturar tudo muito bem com um garfo.
Deitar a massa sobre uma superfície enfarinhada e amassar ligeiramente, formando uma bola.
Untar com azeite uma forma com cerca de 28 a 30cm de diâmetro.
Polvilhar a bancada com farinha e estender a massa, por forma a obter o tamanho ideal para forrar a forma.
Forrar a forma com a massa e picar a base da massa com um garfo.
Colocar a forma no frigorífico e refrigerar por, no mínimo, 30 minutos.


para o recheio:
1kg cogumelos castanhos, ou uma mistura de diferentes variedades
1 cebola média, fatiada muito finamente
sal fino e pimenta preta moída na altura
um fio de azeite
3 ovos grandes, de preferência biológicos
80ml natas para culinária
120ml leite (não usar leite magro)
1 colher sopa de mostarda de Dijon
2 colheres chá de paprica
1/2 chávena de cebolinho, picado finamente, incluindo as flores
preparação:
Arranjar os cogumelos e cortá-los em quartos, ou pedaços grandinhos.
Numa frigideira grande, sobre lume médio, aquecer um fio de azeite.
Adicionar a cebola e 1/4 colher chá de sal e cozinhar, mexendo com frequência, até a cebola estar macia.
Adicionar os cogumelos e 1/2 colher chá de sal e cozinhar, mexendo de vez em quando, até os cogumelos começarem a libertar água, o que poderá demorar cerca de 5 minutos.
Aumentar o lume e cozinhar por mais uns minutos, por fora a que o líquido evapore rapidamente.
Aquecer o forno a 160ºC.
Retirar a base da tarte do frigorífico e levá-la ao forno por cerca de 20 minutos.
Numa taça, misturar os ovos, as natas, o leite, a mostarda, a paprica, 1/2 colher chá de sal e pimenta preta moída.
Retirar a base da tarte do forno e aumentar a temperatura para os 175ºC.
Cobrir a base da tarte com os cogumelos, polvilhar com o cebolinho picado e regar com a mistura dos ovos.
Levar ao forno por 45 minutos, ou até o recheio estar cozido e douradinho.

Recipe / Receita: