Showing posts with label Ginger / Gengibre.. Show all posts

9 October 2017

Red Curry, Ginger and Squash Soup / Sopa de Abóbora, Caril Vermelho Tailandês e Gengibre.


For this month's Rainydaybites Cookbook Club, we are cooking from Joanne Chang and Karen Akunowicz "Myers + Chang at Home" book.
This cookbook brings to the table dishes from the incredibly popular Boston restaurant. The recipes are Asian inspired and unique with a focus on flavour.
The perfect book to kick off the comfort food season and for me, nothing is more comforting than a big bowl of soup and that's why this was the first recipe I chose from the book.
Full of balanced flavours, this soup is perfect for lunch or dinner and it's so satisfying that, after having a warm bowl of it, you don't need anything else.

24 April 2017

Congee with Chicken, Ginger and Poached Egg / Congee com Frango, Gengibre e Ovo Escalfado.


Congee is the Chinese name for rice porridge but it is also known as okayu in Japan, juk in Korea, and jok in Thailand. They all and each have their own unique variations but, it always begin with rice and a liquid (usually water) and sometimes, a little salt.
From this basic start, flavors and textures can be added after, such as kimchi and salted fish (Korea), or pork with fried garlic and scallions (Philippines).
Congee can even be sweetened with sugar and served with fruit, such as pears or apples.
Another variation is to make congee with chicken and ginger.
More than a bowl of good food for the body, Congee also nourishes the soul!!
This recipe is another delicious one from Shu Han Lee "Chicken and Rice" cook book.
It is so, so delicious and comforting that you just want to eat the whole pot by yourself.

7 April 2017

Teriyaki Salmon and Avocado Poke / Poke de Teriyaki de Salmão e Pêra abacate.


Poke is a popular Hawaiian snack of raw fish seasoned with soy sauce and sesame oil.
In the Islands, poke is available everywhere, from food trucks to local Chefs restaurants.
Martha Cheng "The Poke" cookbook is all about this fresh way of eating fish and it's a delightful little book that I intend to use a lot, as I'm a lover of this kind of food.
Saying that, here is y first Poke!

23 March 2017

Vitnamese Ginger Chicken / Frango Vietnamina com Gengibre.


A delicious chicken meal from Melissa Clark new book "Dinner". A book full of different and delicious suggestions. No bread, baking or sweet treats included. Just savoury delicious dinner (or lunch), suggestions. Another great book that I'm very pleased with and that goes directly to my category of the "well spent money" books!
I truly love Asian flavours and combinations and this meal was very tasteful. The chicken, grilled, full of flavour, tender and moist, was a real delight to eat.

24 December 2016

Gingerbread biscuits / Biscoitos de gengibre.


Last post before Christmas and of course, it had to be with my favourite gingerbread dough. Mima Sinclair Gingerbread Wonderland book and her gingerbread dough recipe!
The recipe is here and this time, I used the light version (specified in the recipe).
You can use any shapes of cutters you want and decorate the biscuits as you wish. I kept mine as plain as possible, just dusted with icing sugar but, you can use Royal Icing and go for a more fancy decoration.
Just bake them for 6 to 10 minutes (depending on size), in a preheated oven (160º) and you'll have perfect gingerbread biscuits.
I used snowflakes embossed cutters and these biscuits are a treat for everybody to snack around here and they'll be the biscuits that will be left for Santa alongside a glass of sweet wine and the carrots for the reindeers.
Hope you enjoy this last Christmas suggestion and the only thing left, is to wish you all a very Merry Christmas, full of Joy, Happiness and Health.
MERRY CHRISTMAS!!!

22 December 2016

Chocolate Pain d'Épices / Pain d'Épices de Chocolate.


I have to admit that I've never been mad about Pain d'Épices but last year, after making this Mima Sinclair one, I totally changed my mind and became a massive fan of it.
This year, I decided to try a different recipe and I went for the Eric Lanlard - Chocolat cook book recipe, which is delicious although, I have to say, I still prefer this one here. For me, Mima Sinclair recipe, gives you a moister and less dense "cake" than the one I'm leaving you today.
Anyway, if you are a Pain d'èpices lover, you have to try both by yourselves and decide which one you prefer because tastes are different right?
According to Eric, this Pain d'Épices is delicious toasted and spread with butter or drizzled with honey and I agree!

10 December 2016

Gingerbread and Chocolate Bird House / Casa dos passarinhos em Gengibre e Chocolate.


For December and "Our Great Bake Off", Ana wants us to make gingerbread cookies or "Pepparkakor" like they are called in Sweden.
Apparently today is "Gingerbread Decorating Day" and no better day to publish this gorgeous gingerbread bird's house that I made with my daughter and that was devoured yesterday by her and her classroom mates at school.
The recipe, of course, is from my favourite gingerbread book which is Mima Sinclair "Gingerbread Wonderland" and from which I made, last year, the fabulous suggestions that you can check here, here and here.

1 December 2016

Gingerbread Advent Calendar / Calendário do Advento em Bolachas de Gengibre.


Christmas season is officially open and the first suggestion I'm leaving you is this gorgeous advent calendar.
The recipe is from the new issue of the Donna Hay magazine and It was entirely made by my 10 year old daughter and myself.
It was a 4 hands job from start to finish and I think it looks pretty good and best of all, it is completely natural and totally homemade.
It's easy and fairly quick to make and if you want to give it a go, you're still in time.

29 October 2016

Spicy Pumpkin Soup with Croutons / Sopa de Abóbora com especiarias e Croutons.


Being myself a huge soup lover, I couldn't let October to come to an end, without preparing a pumpkin soup for Marta and her "ingredient of the month" which is the Pumpkin.
I'm so into Fika and Hygge (concepts that I wrote about in this post) and Scandinavian cooking that, as soon as I saw this soup in Trine Hahnemann fabulous "Scandinavian Comfort Food" book, I couldn't help it but make it straightaway.
Of course I don't need books or recipes to make soups because all of us can make soup right?
The thing is, I love different combinations and different flavours because, although I love soups, I hate boring and bland soups. Something that this soup is not at all. Neither boring nor bland.
Actually, it's a fabulous super flavoursome and tasteful soup and that's why I decided to share it with you all and publish it in time for Marta's "October - Pumpkin - Ingredient of the month".

8 March 2016

Asian turkey lettuce wraps / Wraps de alface com peru em molho asiático.


These are the first two recipes (sauce and dish itself) that I tried from Emilie Raffa absolutely gorgeous cookbook!
As you might know, Emilie is the creator of the gorgeous blog "The Clever Carrot".
The book - The Clever Cookbook - is full of simple, delicious and quick and easy to make recipes and, unusually, after my first reading, it was already completely full of post its.
This dish is amazing as the sauce is quickly put together and the flavour that it gives to the meat is incredible. In less than 30 minutes, you'll have an awesome flavourful meal on the table!
It is so delicious that I had to stop myself from eating it all straight from the pan.
We had these wraps as a light lunch during the weekend and everybody (including kids), loved them.
The combination of the asian flavours with the freshness, crispiness and crunchiness of the lettuce and green apple, makes these a truly delicious treat.
Big thumbs up for our "Clever Carrot" Emilie Raffa!!


ingredients for the Master stir-fry sauce (makes 190ml):
78ml soy sauce or tamari
237ml chicken stock (I used Emilie's homemade chicken stock, but use whatever chicken stock you fancy).
2 tbsp honey
1 tsp cornflour
method:
Whisk all the ingredients together until the honey and cornflour are throughly dissolved.
Pour the mixture into a jar and refrigerate up to 2 weeks.
Add the sauce to flavour your  stir fries, being careful to shake the jar very well before using it.
for the wraps:
1 head of a crispy lettuce such as Iceberg or Bibb, leaves separated, washed and dried
1/4 tsp sesame oil
1 tbsp vegetable oil
454g chicken or turkey mince
2 garlic cloves, peeled and grated
5cm piece of ginger, peeled and grated
237ml Master stir-fry sauce (above)
1 green apple, skin on, cut into matchsticks
1 tbsp sesame seeds
method:
Warm both oils in a large skillet.
Add the mince and cook until lightly browned (4 to 5 minutes), or until all the moisture has evaporated.
Add the garlic and ginger and stir for 30 seconds or until fragrant.
Add the Master Stir-fry Sauce, shaking it well before, bring to the boil and simmer for 1 to 2 minutes, or until thickened.
Remove the pan from the heat and serve the mince mixture over the lettuce leaves, topped with the apple and the sesame seeds.
__________________

Hoje deixo-vos as duas primeiras receitas que testei do fabuloso livro da Emilie Raffa!
Como devem saber, a Emilie é a autora do lindo blog o The Clever Carrot.
O livro, cujo título é: The Clever Cookbook, é, todo ele, recheado de fabulosas sugestões.
Receitas fáceis de preparar, repletas de sabor e de ingredientes fabulosos e que fazem parte do nosso dia a dia.
Um livro que, logo após a minha primeira incursão, quando me dei conta, estava carregadíssimo de post its, pois acho que não sobrou nenhuma (ou quanto muito 1 ou duas) receita que não me cativasse e que eu não queira experimentar e testar.
Esta receita, que combina um molho fantástico, é rápida de preparar e, em menos de 30 minutos, têm uma deliciosa refeição na mesa!
Nós, degustámo-la num dos dias do fim de semana ao almoço e todos, incluindo os miúdos, simplesmente amámos!
Eu, depois de preparar a carne, literalmente, tive de me conter para não comer o preparado todo, directamente da frigideira e à colherada!
Os sabores da mistura da carne, combinados com a frescura e o crocante da alface e da maçã, elevam esta receita, simplíssima, a um nível superior e que, sem dúvida, quererão repetir.
Um grande aplauso para a "Clever Carrot" que é a Emilie Raffa!!


ingredientes para o molho de stir-fry (faz 190ml):
78ml de molho de soja ou tamari
237ml caldo de galinha (eu usei caldo de galinha caseiro - receita da Emilie - mas usem o caldo que quiserem).
2 colheres sopa de mel
1 colher chá de Maizena
preparação:
Misturar todos os ingredientes e mexer bem, por forma a desfazer bem o mel e a Maizena.
Colocar a mistura num frasco, tapar e guardar no frigorífico.
Este molho conserva-se no frigorífico por cerca de 2 semanas.
Podem usar este molho em stir-fries de tudo, desde carne, a peixe e vegetais.
Tenham sempre o cuidado de agitar muito bem o frasco antes de adicionar o molho aos vossos cozinhados.
para os wraps:
1 alface de folhas crocantes, tipo iceberg, ou outra do género, folhas separadas, lavadas e bem escorridas.
1/4 colher chá de óleo de sésamo
1 colher sopa de óleo vegetal
454g de carne de peru ou frango, moída
2 dentes de alho, descascados e ralados
5cm de gengibre fresco, descascado e ralado
237ml molho de stir-fry (receita acima)
1 maçã verde, tipo Green Smith, com casca, lavada e cortada em palitos finos
1 colher sopa de sementes de sésamo
preparação:
Numa frigideira larga, aquecer ambos os óleos.
Adicionar a carne escolhida e cozinhar por cerca de 4 a 5 minutos, ou até a carne estar douradinha e não haver líquido na frigideira.
Adicionar o alho e o gengibre ralados e mexer por cerca de 30 segundos, ou até estes estarem aromáticos.
Adicionar o molho de stir-fry, agitando bem o frasco antes de o adicionar ao preparado e cozinhar por 1 minuto ou 2, ou até a mistura ter engrossado.
Retirar a frigideira do lume e servir o preparado sobre as folhas de alface.
Polvilhar com os palitos de maçã e com as sementes de sésamo.

Recipe / Receita:

16 December 2015

Apple & Gingerbread Streusel tart / Tarte de maça, com base e streusel de gingerbread.


Last post of 2015 here on the blog.
The recipe I'm leaving you today, the last of my Christmas suggestions, is this delicious and very Christmassy tart!
Another delightful suggestion from Mima Sinclair gorgeous book "Gingerbread Wondeland".
The base is made of gingerbread instead of the usual pastry and the filling, with apples and spices couldn't be more delicious and moreish.
The crunchy streusel on top, is just "the cherry" on top of the tart.
The blog will be back to its normal activities in the beginning of January. Until then, I Wish you all a very Merry Christmas, full of Health, Joy and lots of Happiness!!


ingredients:
1/2 quantity of dark gingerbread dough (recipe here)
for the filling:
360g Bramley apples, peeled and cored
300g eating apples, peeled and cored
juice of 1 lemon
75g granulated sugar
75g soft light brown sugar
3 tbsp plain flour
1 tsp ground cinnamon
1/4 tsp ground allspice
1/2 tsp salt
75g sultanas (I used dried cranberries)
20g butter, cubed
for the streusel topping:
40g plain flour
40g granulated sugar
1/2 tsp ground ginger
pinch of salt
60g cold butter, cut into small cubes
30g pecans, roughly chopped
method:
Heat the oven to 180ºC.
Roll out the gingerbread dough over a piece of baking paper, to 5mm thick x 32cm diameter.
Line a deep 23cm flutter tart dish with the dough. Press gently into the edges and trim any excess with a sharp knife, reserving the trimmings.
Place the tart case in the freezer to chill for 20 minutes.
Cut the apples into 5mm thick slices.
Squeeze over the lemon juice, then toss in a large bowl with the sugars, flour, spices, salt and sultanas.
Pile high into the chilled gingerbread case, then press down to fill the gaps.
Dot with the butter and place on a baking tray to catch any spills.
Bake for 20 minutes on the middle shelf of the oven.
To prepare the streusel, mix the flour, sugar ginger and salt until combined.
Cut 50g of the reserved gingerbread dough into small chunks and add to the mix with the butter.
Rub together with the tip of your fingers to form clumps. Stir through the pecans.
After the tart has baked 20 minutes, sprinkle over the streusel mixture and return to the oven to bake for a further 30 minutes, or until golden and bubbling and the apples are tender when pierced with a sharp knife.
Remove the tart from the oven and set aside to cool slightly before serving.
I served my tart with vanilla custard to make it even more indulgent, but feel free to serve yours with whatever you fancy or just on its own.

__________________

Deixo-vos hoje com o que será o último post de 2015 aqui no blogue e a última sugestão para uma sobremesa com sabores festivos e Natalícios.
Mais uma super deliciosa receita retirada do lindíssimo livro "Gingerbread Wonderland" da Mima Sinclair.
A receita, esta tarte magnífica, com uma base de gingerbread em vez da tradicional massa de tartes, um recheio soberbo de maças e especiarias e um topping crocante.
Uma tarte com sabores e aromas super festivos e que recomendo vivamente a experimentarem.
O blogue (eu, lol) vai estar de férias até ao início de Janeiro, altura em que por aqui retomaremos as publicações.
Entretanto e para todos os que aqui passam, desejo desde já um excelente e Feliz Natal, repleto de Saúde, Alegria, muita Harmonia e... prendinhas no sapatinho :)))!


ingredientes:
1/2 quantidade da receita deste gingerbread
para o recheio:
360g maçãs Bramley (ou semelhantes), descascadas e descaroçadas
300g maçãs tipo Lady Pink ou outra maça doce, descascadas e descaroçadas
sumo de 1 limão
75g açúcar granulado branco
75g açúcar amarelo
3 colheres sopa de farinha de trigo branca
1 colher chá de canela em pó
1/4 colher chá de pimenta da Jamaica em pó
1/2 colher chá de sal
75g sultanas (eu usei arandos secos)
20g manteiga, cortada em cubos
para o topping de streusel:
40g farinha de trigo branca
40g açúcar granulado
1/2 colher chá de gengibre em pó
uma pitada de sal
60g manteiga fria, cortada em cubos pequenos
30g pecã, picadas grosseiramente
preparação:
Aquecer o forno a 180ºC.
Estender a massa de gingerbread sobre uma folha de papel vegetal, até obter uma espessura de 5mm e um diâmetro de 32cm.
Forrar uma tarteira funda para tartes, com 23cm de diâmetro, com a massa e pressioná-la bem sobre toda a superfície da tarteira.
Cortar os excessos de massa com uma faca afiada e reservá-los.
Colocar a tarteira forrada com a massa de gengibre no congelador por cerca de 20 minutos.
Cortar as maças em meias luas com cerca de 5mm de espessura.
Numa taça, colocar as maças, o sumo do limão, os açúcares, a farinha, as especiarias, o sal e as sultanas e misturar tudo muito bem.
Colocar este recheio sobre a massa gelada e pressionar, por forma a que toda a superfície da massa fique recheada.
Espalhar os cubinhos de manteiga sobre a mistura das maçãs e colocar a tarteira sobre um tabuleiro, para que se houver líquido, este não caia para o forno.
Levar a tarteira ao forno e cozer, na prateleira do meio, por cerca de 20 minutos.
Para preparar o topping (streusel), misturar muito bem a farinha, com o açúcar, o gengibre em pó e o sal.
Cortar 50g dos restos da massa de gengibre em pedacinhos e adicioná-los, juntamente com os cubos de manteiga, ao preparado anterior.
Misturar tudo muito bem com as pontas dos dedos, como se de um crumble se tratasse, até obter uma mistura grosseira e com pedaços.
Adicionar as nozes pecã e envolver tudo.
Após os 20 minutos que a tarte esteve no forno, retirá-la, e polvilhá-la com o topping.
Voltar a colocar a tarte no forno por cerca de 30 minutos, ou até o topping estar douradinho e as maças estarem macias, quando espetadas com uma faca afiada.
Retirar a tarte do forno e deixá-la arrefecer ligeiramente antes de servir.
Eu servi a minha tarte com custard de baunilha, mas sirvam a vossa com o que bem vos apetecer, ou sem qualquer tipo de acompanhamento.


Recipe / Receita:

7 December 2015

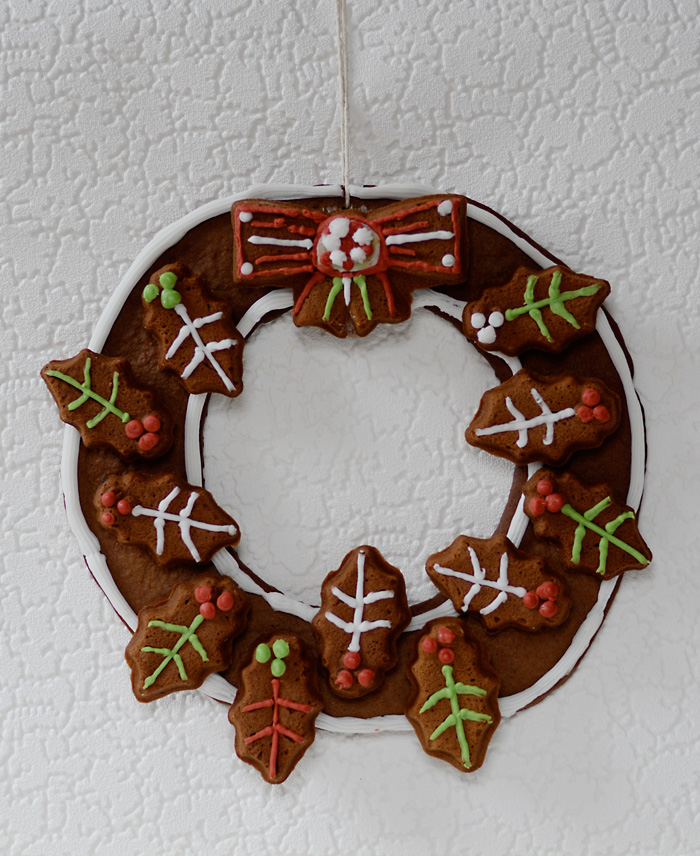
Gingerbread wreath / Coroa de gengibre.


The December issue of Delicious Magazine arrived full of gorgeous and scrumptious suggestions for Christmas and my first Christmas bake this year, is this gingerbread wreath.
The gingerbread dough itself, is from Mima Sinclair fantastic book "Gingerbread Wonderland" and it's the best gingerbread I ever tried. It is so easy to work with that it will be the dough I'm going to use for the annual gingerbread house (if I have the time to make it of course...).
For the decorations, I used shop bought icing but feel free to make your own.
ingredients for the gingerbread dough:
60g light molasses, golden syrup or honey
80g black treacle (for a darker dough like mine)
Note: If you don't want to use the black treacle, use 140g of the golden syrup, molasses or honey.
200g soft light brown sugar
200g unsalted butter
finely grated zest of 1 lemon
4 tsp ground ginger
2 tsp ground cinnamon
1/2 tsp freshly grated nutmeg
1/4 tsp ground cloves
1/2 tsp bicarbonate of soda
500g plain flour
1 tsp salt
1 medium egg, lightly beaten
for the decoration:
white, red and green icing or royal icing (or any other colours you fancy)
caramel glue, optional
method:
In a large saucepan, heat the golden syrup, black treacle, sugar, butter, lemon zest and spices, stirring over a low to medium heat, until the sugar has dissolved.
Increase the heat and bring the mixture to a boiling point, then take off the heat and beat in the bicarbonate of soda.
Leave to cool for 15 minutes and then pour the mixture into a large mixing bowl.
Sift the flour and salt, then fold into the spiced sugar mixture in batches, using a wooden spoon or a stand mixer.
Add the egg and beat until just combined.
The dough will be very sticky but don't be tempted to add more flour.
Scrape out the dough onto a clean surface and knead together until just smooth.
Wrap in clingfilm and chill in the fridge for 1 hour.
Preheat the oven to 160ºC.
Line 3 large baking trays with baking paper.
Cut a large piece of baking paper and roll out the gingerbread dough on top of it until 5mm thick.
Put a 25cm plate on the dough and cut round it. Using a smaller plate, cut out the centre to give a 4cm wide ring of dough.
Using different size cutters and shapes, cut out shapes from the remaining dough.
Freeze the gingerbread shapes for 5 minutes until hard.
Bake the shaped biscuits in batches, for 10 to 15 minutes or until golden brown at the edges.
Bake the ring for 15 to 20 minutes or until golden brown  at the edges.
Leave to cool inside the trays for 5 minutes and then transfer onto wire racks to cool completely.
Once cooled, decorate with the icings and colours of your choice. Arrange the shapes to taste on the ring.
Using the white icing or caramel (made with 200g sugar and 60ml of cold water), glue the back of the biscuits to the ring and leave to set firm.

__________________

A revista Delicious deste mês vem recheada de lindas e deliciosas sugestões para o Natal e uma delas, é uma coroa de gengibre decorada com estrelas, mas que eu decidi decorar com folhas de azevinho.
Embora a receita venha na revista, a mesma é retirada do livro "Gingerbread Wonderland" da autora Mima Sinclair.
A massa de gengibre, é, sem dúvida, a melhor que já fiz e é tão fácil de trabalhar que, se ainda tiver tempo claro, será com esta base de massa que farei a casinha de gengibre.
Quanto ao sabor, é também o mais delicioso biscoito de gengibre que já provei.
Quanto ás decorações, eu usei icing de compra e em bisnaga, mas se quiserem, podem fazer o vosso em casa e colori-lo a gosto e de acordo com os formatos de biscoito escolhidos.
Assim sendo, aqui fica a coroa de Natal de gengibre, a primeira sugestão de Natal a sair da minha cozinha!
ingredientes para a massa de gengibre:
60g melaço light, golden syrup ou mel (eu usei golden syrup) ou 140g de uma destas opções, caso não queiram usar o black treacle que está mencionado a seguir.

80g black treacle (no caso de quererem um biscoito escuro como o meu)
200g açúcar amarelo
200g manteiga sem sal
raspa de 1 limão
4 colheres chá de gengibre em pó
2 colheres chá de canela em pó
1/2 colher chá de noz moscada ralada na altura
1/4 colher chá de cravinho em pó
1/2 colher chá de bicarbonato de sódio
500g farinha de trigo branca
1 colher chá de sal fino
1 ovo médio, ligeiramente batido
para decorar:
icing vermelho, verde e branco ou as cores escolhidas de acordo com o formato dos biscoitos,
caramelo, para colar, opcional
preparação:
Num tacho sobre lume baixo a médio, colocar todos os primeiros ingredientes e todas as especiarias (9 primeiros ingredientes).
Aquecer, mexendo sempre, até o açúcar estar dissolvido.
Aumentar o lume e deixar que a mistura atinja o ponto de ebulição. Retirar o tacho do lume e adicionar o bicarbonato de sódio, mexendo bem.
Deixar a mistura arrefecer por 15 minutos e depois transferi-la para uma taça.
Peneirar a farinha com o sal e adicioná-la, em 2 ou 3 vezes, à mistura anterior, mexendo bem com uma colher de pau ou, se preferir, com a batedeira eléctrica.
Adicionar o ovo batido e bater só até este estar incorporado (atenção para não bater em demasia).
A massa ficará molenga e pegajosa mas não adicione mais farinha.
Colocar a massa sobre a bancada da cozinha e amassar, só até esta estar macia.
Embrulhar a massa em película aderente e refrigerar por 1 hora.
Aquecer o forno a 160ºC.
Forrar 3 tabuleiros com papel vegetal.
Sobre uma folha grande de papel vegetal, estender a massa com o rolo, até obter uma espessura de cerca de 5mm.
Colocar um prato com cerca de 25cm de diâmetro sobre a massa e cortar a massa à volta do prato.
Colocar um prato menor ou uma tigela em cima do círculo anterior (no centro) e cortar à volta, a fim de obter um anel com cerca de 4 cm (usar o centro cortado para os biscoitos).
Colocar o anel num dos tabuleiros preparados e congelar por 5 minutos.
Com cortadores de biscoitos das formas e tamanhos desejados, cortar formas com o restante massa e colocá-las nos tabuleiros. Congelar por 5 minutos.
Levar o tabuleiro com o anel ao forno e cozer por  a 20 minutos, ou até os bordos estarem douradinhos.
Cozer os restantes biscoitos no forno, por cerca de 10 a 15 minutos, ou até estarem douradinhos nos bordos.
Deixar tudo arrefecer nos tabuleiros por cerca de 5 minutos, antes de transferir para grelhas, para arrefecimento completo.
Depois de frios, decorar os biscoitos a gosto e com as cores de icing escolhidas.
Arranjar os biscoitos em cima do anel, até obterem o efeito desejado.
Usar o icing branco para colar as costas dos biscoitos ao anel ou, caso prefiram, usem caramelo (façam um caramelo com 200g açúcar refinado branco e 60ml de água fria) como cola.
Depois de colados todos os biscoitos, deixar a coroa repousar até o icing ou o caramelo estarem completamente secos e firmes.


Recipe / Receita: Delicious magazine - December 2015.

19 November 2015

Pistachio and yoghurt chicken curry with Naan bread / Caril de frango com iogurte e pistachios e pão Naan.


Cold and rainy days, call for a cozy and warm blanket and a comforting bowl of food and this rich and creamy curry couldn't be more comforting and delicious.
The Naan bread, is the most delicious one I ever tried and it is so easy to make and the perfect accompaniment for the creamy sauce of the curry.
ingredients (serves 4):
100g unsalted pistachios, plus extra to serve
5cm ginger, peeled and roughly chopped
4 cloves of garlic, roughly chopped
3 tbsp rapeseed oil (I used olive oil)
2 large onions, sliced into fine rings
2 large ripe tomatoes, roughly chopped
1/4 tsp ground black pepper
1 tsp garam masala
1/2 tsp chilli powder
1 tbsp coriander seeds, crushed
1/2 tsp ground cardamom
4cm cinnamon stick or 1 tsp ground cinnamon
1 tsp salt or to taste
800g skinless, boneless chicken thighs, chopped into 2cm cubes
250ml hot chicken stock
4 tbsp Greek yoghurt, plus extra to serve
juice of 1/2 a lemon
method:
In a food processor or spice grinder, grind the pistachios to a fine powder and set aside.
Bash up the ginger and garlic in a pestle and mortar to a coarse paste and set aside.
Put the oil in a wide-bottomed, lidded frying pan on a medium heat and, when it's hot, add the onions.
Fry the onions until they are caramelised, which should take around 20 minutes.
Add the garlic and ginger paste and stir fry for 3 to 4 minutes, before adding the tomatoes.
Put the lid on the pan and leave to cook for around 5 minutes, or until the tomatoes start to break down.
Add the black pepper, garam masala, chilli powder, coriander, cardamom, cinnamon and salt.
Stir everything together and then add the chicken. Turn the chicken so that it seals on all sides.
Add the ground pistachios and stir fry for 1 minute and then pour in the chicken stock.
Stir the yoghurt with a fork and then add it into the pan, string everything together.
Pop the lid on the pan and leave to cook for around 15 minutes.
Taste the curry and adjust the seasoning if needed.
If you want, you can add a little water in order to achieve a more saucy consistency.
Serve the curry with the Naan bread and/or Basmati rice and top it with a dollop of yoghurt, a scatter of chopped pistachios and a squeeze of the lemon juice.


ingredients for the Naan bread (makes 12):
500g plain flour + extra to dust the dough
rapeseed oil (I used olive oil)
4 tbsp whole-milk yoghurt
7g dried yeast
2 tsp sugar
2 tsp salt
1 level tsp baking powder
275ml whole milk, hand hot
method:
Put the flour into a large mixing bowl. Make a well in the middle and add 2 tbsp of oil, the yoghurt, yeast, sugar, salt and baking powder.
Mix through with your fingers until the ingredients resemble breadcrumbs. Add the warm milk, little by little, and mix again until it comes into a dough.
Put the dough on to a clean and well floured surface and knead for about 5 minutes.
Transfer the dough to a bowl, cover and leave it in a warm place for at least 1 hour, or until doubled in size.
When the dough has doubled in size, divide it into 12 pieces.
Take one piece, roll it into a ball and flatten it between your palms. Coat it in fresh flour and roll it out to around 12cm x 20cm.
Put a frying pan on a medium heat and, when hot, place the naan in it.
When the naan starts to bubble (that can take about 20 to 30 seconds), flip it over, using a spatula, and cook on the other side, for the same amount of time. Be careful to not burn it.
Flip over again and quickly press it gently all over with a spatula, for 10 to 15 seconds.
Turn the naan over again for another 10 to 15 seconds and if cooked perfectly (without uncooked doughy bits), take it off the pan.
Cook the remaining naans in the same way, keeping the cooked ones warm by stacking them on top of each other and wrapping them in foil.

__________________

Dias frios e chuvosos só pedem comidinha de conforto e acreditem, eu sei que aqui é a terra da chuva, mas estas duas últimas semanas tem sido demais.
Já me questiono onde é que há tanta água para deitar abaixo..., e isto para não falar nos ventos fortíssimos e nas temperaturas baixas que acompanham as tempestades de chuva que têm caído incessantemente.
Enfim, lamúrias à parte, pois eu não sou de me lamentar e sim de aceitar o que a vida e a Natureza têm para me oferecer, deixo-vos hoje com este caril de frango maravilhoso e com o que, acreditem, é o melhor pão Naan que já comi até hoje (e isto não quer dizer que seja o melhor do mundo, pois muitos haverá para experimentar...).
Comidinha de conforto que nestes dias é o que sabe melhor, pois aquece o corpo e a alma.


ingredientes (para 4 pessoas):
100g pistachios sem sal + extra para servir
5cm gengibre fresco, descascado e picado grosseiramente
4 dentes de alho, descascados e picados grosseiramente
3 colheres sopa de óleo de colza ou canola (eu usei azeite, pois não gosto do óleo de canola)
2 cebolas grandes, cortadas em rodelas finas
2 tomates grandes e maduros, picados grosseiramente
1/4 colher chá de pimenta preta moída na altura
1 colher chá de garam masala
1/2 colher chá de malagueta em pó
1 colher sopa de sementes de coentros, esmagadas
1/2 colher chá de cardamomo em pó
1 pau de 4cm de canela, ou 1 colher chá de canela em pó
1 colher chá de sal, ou a gosto
800g sobre coxas de frango, sem pele e sem osso e cortadas em cubos de cerca de 2cm
250ml caldo de galinha quente
4 colheres sopa de iogurte grego + extra para servir
sumo de 1/2 limão
preparação:
No copo do robot de cozinha ou num moinho de especiarias, reduzir os pistachios a farinha e reservar. 
No almofariz, esmagar os alhos e o gengibre, até obter uma pasta grosseira. Reservar.
Colocar o óleo numa frigideira de fundo largo que tenha tampa e aquecer sobre lume médio.
Quando o óleo estiver quente, adicionar as cebolas e fritar até estas estarem caramelizadas, o que poderá demorar cerca de 20 minutos.
Adicionar a pasta de alho e gengibre e fritar, mexendo sempre, por cerca de 3 a 4 minutos.
Adicionar os tomates, tapar a frigideira e cozinhar por cerca de 5 minutos, ou até os tomates começarem a desfazer.
Adicionar a pimenta preta, a garam masala, a malagueta em pó, as sementes de coentros, o cardamomo, a canela e o sal e mexer tudo muito bem.
Adicionar o frango e mexer, por forma a selar todos os lados do mesmo.
Adicionar os pistachios em pó e mexer por cerca de 1 minuto, antes de adicionar o caldo de galinha.
Mexer bem o iogurte com um garfo e adicioná-lo à mistura anterior, mexendo tudo muito bem.
Tapara a frigideira e deixar cozinhar por cerca de 15 minutos.
Provar o caril e rectificar os temperos a gosto.
Caso queiram e achem necessário, podem adicionar um bocadinho de água, por forma a obter um molho mais cremoso.
Servir o caril decorado com uma colherada de iogurte, pistachios picados e regar com um bocadinho do sumo de limão.
Acompanhar com/ou arroz Basmati e o pão Naan.


ingredientes para o pão Naan (para 12):
500g farinha de trigo branca + extra para polvilhar a bancada e o pão
óleo de canola ou colza (eu usei azeite)
4 colheres sopa de iogurte natural gordo
7g fermento biológico seco
2 colheres chá de açúcar
2 colheres chá de sal fino
1 colher chá (nivelada) de fermento em pó
275ml leite gordo, morno


preparação:
Colocar a farinha numa taça larga. Fazer um buraco no meio e adicionar 2 colheres de sopa do óleo ou azeite, o iogurte, o açúcar, o fermento de padeiro seco, o sal e o fermento em pó.
Misturar tudo muito bem com as pontas dos dedos, até obter uma mistura areada.
Adicionar o leite morno, um bocadinho de cada vez, até a mistura formar uma massa.
Colocar a massa sobre uma superfície limpa e bem enfarinhada e amassar por cerca de 5 minutos.
Transferir a massa para uma taça, cobrir com película aderente e deixar levedar em local aquecido, por cerca de 1 hora, ou até ter duplicado de tamanho.
Quando a massa tiver duplicado de tamanho, dividi-la em 12 pedaços iguais. Formar uma bola com um pedaço da massa e depois, espalmá-la entre as palmas das mãos.
Polvilhar a massa com farinha e estender com o rolo, por forma a obter um rectângulo com cerca de 12 x 20cm. Repetir para os restantes pedaços de massa.
Colocar uma frigideira sobre lume médio e, quando bem quente, colocar um naan na frigideira.
Quando a parte de cima do pão formar bolhas, o que demorará cerca de 20 a 30 segundos, virá-lo com a ajuda de uma espátula e cozinhar do outro lado por mais 20 a 30 segundos, tendo cuidado para não deixar queimar.
Voltar a virar o pão e, com a ajuda da espátula, pressionar delicadamente, a superfície do mesmo por cerca de 10 a 15 segundos.
Voltar a virar e cozinhar por mais 10 a 15 segundos, verificando se não há bocados de massa crua.
Retirar o pão da frigideira e repetir o processo para os restantes pães.
Enquanto se cozinham os pães restantes, manter os que já estão cozinhados quentes, simplesmente colocando-os uns em cima dos outros e embrulhando-os em folha de alumínio.

Recipe / Receita: